
I'm struggling to follow every detail of what you are building here, but I get the sense that this could be used to recreate a prior session - almost like a time machine that switches Puppy back to all the documents and directories you were "looking at last night".
Is this how you see it or am I way off base?
Add A JWM Bookmarks Menu or Submenu/Messing Around With JWM
-
Puppus Dogfellow

- Posts: 1667
- Joined: Tue 08 Jan 2013, 01:39
- Location: nyc
that's one way to look at it. also like a staggered autostart of sorts. one of the reasons i hate rebooting is getting things i want opened where and how i want them opened, etc, so i ended putting quite a bit of stuff in my start up folder and rarely touch it. over time i noticed there are groups of files i like to have opened in, for example, geany, and folders i always seem to be opening up to move stuff back and forth between in rox. so rather than make it a menu item, i end up making stuff like that a button or prominent entry on the gexec history, which not only allows me to instantly edit it but also allows me to get quickly into jwmpersonal, etc. you kind of got ahead of me. i was going to post a bunch of (hopefully) useful groupings (mostly files with geany and folders with rox) as scripts and keyboard shortcuts, but first i had planned to talk about ways to divide the keyboard to best allow you to keep track of (what can become) a pretty lengthy list of shortcuts. in fact, i had just come here to post fifty i thought would be pretty useful...greengeek wrote:I'm struggling to follow every detail of what you are building here, but I get the sense that this could be used to recreate a prior session - almost like a time machine that switches Puppy back to all the documents and directories you were "looking at last night".
Is this how you see it or am I way off base?
a shortcut key to the startup folder and root/my-applications/bin gives me access to much of what i would end up adding (i like to use the spacebar plus modifer to open rox stuff. it's a quick way in (10 speed dials beyond what you just opened) and out (if a rox window is active, cadi/ccdi to close them instantly. a millisecond more if not: shift+spacebar (for example) to open it, ccdi (alt+shift+h) to close whatever rox windows have piled up), but it strikes me that yes, the pull down menus could actually take you to what you were working on with what you were using with little more info than just where you were (dragging files/folders to leafpad documents to get their pastable paths becomes pretty routine and useful).
of course, to kill all the rox windows, it'd probably be easier to just call terminal (shift+space), cr, enter...see which method of then closing the terminal best fits you...
Last edited by Puppus Dogfellow on Tue 19 Aug 2014, 10:21, edited 1 time in total.
-
Puppus Dogfellow
- Posts: 1667
- Joined: Tue 08 Jan 2013, 01:39
- Location: nyc
The Control Rug/Pug Control 50
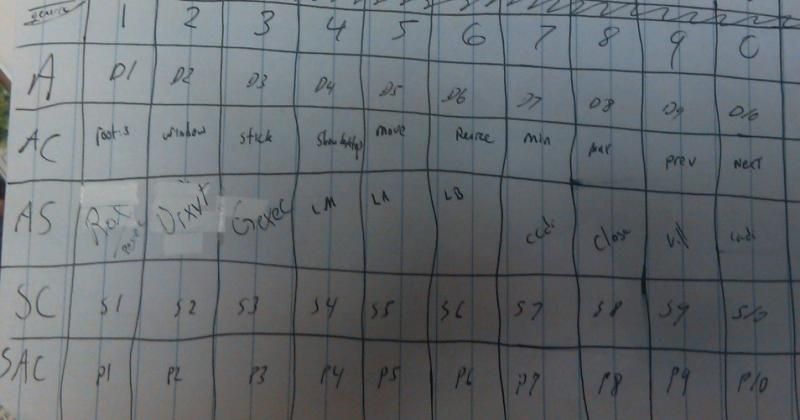
so that's what the layout is, more or less. s1-s10 will turn the cursor into a cross hair that will send the next window clicked to that desktop. d1-10 is go to desktop--1-9 is built in so you really only need d10. p are the ten panels. will give more of an explanation and will repost the code for it sometime later tonight at the latest. it can be pieced together pretty easily from what's on the preceding page. lm la lb are layers (more crosshair stuff), most of the other stuff is self explanatory. ccdi closes all the current instances of the active window and so does cadi--the difference is that cCdi does it for only the Current desktop and cAdi does it for All of them.
so now that i've discovered pexec, i'm not as enthusiastic idea about having those last three remaining keys (after show desktop, ten panels, desktops, send-to targets, three layers, windows menu, main right click menu, stick toggle (again, you get a crosshair), and whatever else seemed required to give control and access...) be RUG--the Urxvt terminal sandwiched between Rox (you need to get into the file system) and Gexec (you can do it rather precisely with this and change how you do it as you are doing it, the recording of which becomes an instant shortcut...another set of bookmarks of sorts...). pexec plus gexec gives you PUG, an acronym as easily remembered as the one pups may pee on or rest upon and which fits in with much of the naming scheme within the community. you get two custom menus, another terminal beyond the one the tilde generally calls... so, either way seems okay to me to offer as a general suggestion for the fifty.
***
to get the 50 shortcut keys in the photo:
after the sets from homerow, spacebar, f1-12, backspace, escape, and tab are complete (or begun--potentially hundreds await...), you may notice you have copies even beyond taking into account the fact that some have been purposely included because you want to be able to execute quickly with either hand as well as with both. this gateway to your machine is both a sculpture in progress and videogame of sorts...Place The Following in /root/.jwm/jwmrc-personal:
<Key mask="A" key="1">exec:wmctrl -s0</Key>
<Key mask="A" key="2">exec:wmctrl -s1</Key>
<Key mask="A" key="3">exec:wmctrl -s2</Key>
<Key mask="A" key="4">exec:wmctrl -s3</Key>
<Key mask="A" key="5">exec:wmctrl -s4</Key>
<Key mask="A" key="6">exec:wmctrl -s5</Key>
<Key mask="A" key="7">exec:wmctrl -s6</Key>
<Key mask="A" key="8">exec:wmctrl -s7</Key>
<Key mask="A" key="9">exec:wmctrl -s8</Key>
<Key mask="A" key="0">exec:wmctrl -s9</Key>
#this does the same as putting the d1-d10 scripts in /root/my-applications/bin and using exec:d[1-10] between the > and <. the advantage to taking that additional step is that you could then d# yourself to and fro from pexec/gexec or the terminal. jwm moves you from desktop to desktop by default through this shortcut but 0 doesn't work for desktop ten. if you don't care about teleporting by terminal, you may only need the last one (and then only if you keep all ten desktops. paring them down opens up other keys for shortcuts. you can also factor in the windows key as an additional modifier (use 4 for the windows key in the same way you use ASC for Alt, Shift, and Control).
<Key mask="AC" key="1">root:3</Key>
<Key mask="AC" key="2">window/Key>
<Key mask="AC" key="3">exec:s0</Key>
<Key mask="AC" key="4">showdesktop</Key>
<Key mask="AC" key="5">move</Key>
<Key mask="AC" key="6">resize</Key>
<Key mask="AC" key="7">minimize</Key>
<Key mask="AC" key="8">maximize</Key>
<Key mask="AC" key="9">prev</Key>
<Key mask="AC" key="0">next</Key>
<Key mask="SA" key="1">exec:pexec</Key>
<Key mask="SA" key="2">exec:urxvt</Key>
<Key mask="SA" key="3">exec:gexec</Key>
<Key mask="SA" key="4">exec:lm</Key>
<Key mask="SA" key="5">exec:la</Key>
<Key mask="SA" key="6">exec:lb</Key>
<Key mask="SA" key="7">exec:ccdi</Key>
<Key mask="SA" key="8">close</Key>
<Key mask="SA" key="9">kill</Key>
<Key mask="SA" key="0">exec:cadi</Key>
<Key mask="SAC" key="1">exec:p1</Key>
<Key mask="SAC" key="2">exec:p2</Key>
<Key mask="SAC" key="3">exec:p3</Key>
<Key mask="SAC" key="4">exec:p4</Key>
<Key mask="SAC" key="5">exec:p5</Key>
<Key mask="SAC" key="6">exec:p6</Key>
<Key mask="SAC" key="7">exec:p7</Key>
<Key mask="SAC" key="8">exec:p8</Key>
<Key mask="SAC" key="9">exec:p9</Key>
<Key mask="SAC" key="0">exec:p10</Key>
#four panels toggle on and off and/or replace each other. screen (desktop space, though folded back onto itself) extension/workbench/pop-up menu frame
<Key mask="SC" key="1">exec:wmctrl -r :SELECT: -t0</Key>
<Key mask="SC" key="2">exec:wmctrl -r :SELECT: -t1</Key>
<Key mask="SC" key="3">exec:wmctrl -r :SELECT: -t2</Key>
<Key mask="SC" key="4">exec:wmctrl -r :SELECT: -t3</Key>
<Key mask="SC" key="5">exec:wmctrl -r :SELECT: -t4</Key>
<Key mask="SC" key="6">exec:wmctrl -r :SELECT: -t5</Key>
<Key mask="SC" key="7">exec:wmctrl -r :SELECT: -t6</Key>
<Key mask="SC" key="8">exec:wmctrl -r :SELECT: -t7</Key>
<Key mask="SC" key="9">exec:wmctrl -r :SELECT: -t8</Key>
<Key mask="SC" key="0">exec:wmctrl -r :SELECT: -t9</Key>
#this does the same as putting the s0-s10 scripts in /root/my-applications/bin and using exec:s[1-10] between the > and <. . the advantage to taking that additional step is that you could then s# stuff to and fro from pexec/gexec or the terminal. s0, which appears elsewhere, is the sticky toggle.
<Key mask="SAC" key="1">exec:p1</Key>
<Key mask="SAC" key="2">exec:p2</Key>
<Key mask="SAC" key="3">exec:p3</Key>
<Key mask="SAC" key="4">exec:p4</Key>
<Key mask="SAC" key="5">exec:p5</Key>
<Key mask="SAC" key="6">exec:p6</Key>
<Key mask="SAC" key="7">exec:p7</Key>
<Key mask="SAC" key="8">exec:p8</Key>
<Key mask="SAC" key="9">exec:p9</Key>
<Key mask="SAC" key="0">exec:p10</Key>
#four panels toggle on and off and/or replace each other. screen (desktop space) extension/workbench/popup menu frame
#requires wmctrl, sticky supplemental pack, panel pack, dash,...will soon make a neater, all-inclusive package, but for now all available a page or two back--a few pets and small compressed folders.
#this is the Pug Control version. i recommend placing all the names of the scriptlets in the .pexec_history file. it'll be a quick duplicate of all the functions of these keys as a way to get you started with it. gexec provides a slightly more responsive menu so we might as well free it up. the reason i opted for this rather than the Control Rug is because Rox (and pretty much everything) is really more quickly launched through the spacebar. while pexec and gexec are self-closing, the terminals (most of them--urxvt, rxvt, sakura, termit) hold the additional information we added to .bashrc (they flash the window and desktop info when first opened) and allow for commands such as wl or wd (windows list, desktop list) to be entered and the results be human-readable ("i think pexec/gexec executed the command--i think that's what that blip was..."). if you're using the terminals to open and close and navigate, that is, if you are using them to enter the terminal shortcuts discussed a few pages back, you might be better served by pexec/gexec because their self-closing nature prevents their windows from piling up/eliminates the step needed to close them. just as Rox is most quickly reached by (Modifier +) Spacebar, so too are the terminals. other than maybe placing one on homerow, nothing would less interrupt typing flow.
(in case you were wondering why i don't find thinking about stuff like this tedious. zapping windows is pretty much the same at my age as zapping zombies, soldiers, or space invaders.)
Though it may be true that the spacebar is the fastest way into the filing system, using a modified number key also makes sense: your fingers would already be in position to press a speed dial key (Ctrl+[0-9] bookmarks within rox; that number (minus the ctrl key) will return to that folder from within any other rox folder).
-
Puppus Dogfellow
- Posts: 1667
- Joined: Tue 08 Jan 2013, 01:39
- Location: nyc
Spacebar keycuts to complement PUG
as usual, add to .jwmrc_personal.
I haven't actually tested to see if the Winkey works when partnered with the other modifiers. if you're going to test it out, remember that for the windows functions (move, resize, etc. "kill" is actually a call to a program and needs the "exec:"), you need to remove the "exec:"; regular programs and scripts will not run without it.
changes done in jwmrc-personal, jwrc-tray, .jwmrc, /etc/xdg/templates/_root_.jwmrc, and your custom.jwmrc file (if it exists) need a jwm restart to take effect. changes done to scripts placed in the path (for example, in /root/my-applications/bin) will be immediately reflected in the key, icon, menu item, or button that calls them.
as for the program/file choices, you can swap out termit for Urxvt or Rxvt if you don't feel like installing it. it allows copy and paste without having to use middle click through shortcut keys and the right click menu (tip: if you don't have a middle button, you can press left and right together for the same effect in rxvt/urxvt).
Control+Shift+Alt + Spacebar opens Geany and most of the files you may need to touch if following this thread. I also added notes and scrap--voila!, now it's a note-taking app. if any of the files are already opened in geany, the others will just be added to them. as to the two scrap files, you can use them as they're labeled, or you can also use them to help you launch things. in geany, if you go to view > show message window and click the terminal tab, you get a terminal beneath your document into which you can paste your growing and refined list of rox ____ ___ ____ or geany ____ ____ ___----that stuff can also be used for "menu items" when copied into .pexec_history or .gexec_history.
for rox, i chose what i thought would be useful or what's been brought up in the thread. simple to open to root, but you need to use an additional finger to get the pairs of folders to open. as with everything, a template for you to play around with.
i included the custom.jwmrc file i need on this machine--if you insist on editing .jwmrc instead of going through the personal folders in /root/.jwmrc or the _root_.jwrc file in /etc, this is one of the easiest ways to rename it to .jwmrc when necessary. (right click >copy >delete >enter >enter is probably easier.)
to convert any of these keys into terminal shortcuts, just open a file, place
#!/bin/bash
atop, and then paste in the same code from above that sits between the ><, taking out the "exec:".
so, for example, the last one from above becomes
give it a name you'll remember and that's pretty short--for this one i suggest "tweak." you can then go back to .jwmrc-personal and swap out the code for "exec:tweak." this way, you can more easily mess around with the contents and more readily see the results.
tip: /root/.bashrc may provide some commands worth pasting into your scrap or g(p)exec_history file.
tip2: if any of the programs fails to launch, especial at first run, check the permissions (file name should be green in a stock rox setup--if not, right click, permissions, quiet or yes) or its location (it must be in the path--enter into a terminal to see acceptable locations to copy, move, or link your scripts/programs into.
enjoy.
Code: Select all
<Key mask="A" key="space">exec:gexec</Key>
<Key mask="C" key="space">exec:rox</Key>
<Key mask="S" key="space">exec:termit</Key>
<Key mask="CA" key="space">exec:rox /root/my-applications/bin /usr/share/applications</Key>
<Key mask="CS" key="space">exec:rox /mnt /mnt/home</Key>
<Key mask="AS" key="space">exec:rox /root/Startup /root/puppy-reference</Key>
<Key mask="CAS" key="space">exec:geany /root/.pexec_history .gexec_history /root/.gexec /root/despitethewarning.jwmrc /root/.jwmrc /root/scrap /root/notes /root/.jwmrc-tray /etc/xdg/templates/_root_.jwmrc /root/.jwm/jwmrc-personal /root/.jwm/jwmrc-personal2</Key>

#and if you've got a windows key, here's a template for another 8:

<Key mask="4" key="space">exec:</Key>
<Key mask="4A" key="space">exec:</Key>
<Key mask="4C" key="space">exec:</Key>
<Key mask="4S" key="space">exec:</Key>
<Key mask="4CA" key="space">exec:</Key>
<Key mask="4CS" key="space">exec:</Key>
<Key mask="4AS" key="space">exec:</Key>
<Key mask="4CAS" key="space">exec:</Key>changes done in jwmrc-personal, jwrc-tray, .jwmrc, /etc/xdg/templates/_root_.jwmrc, and your custom.jwmrc file (if it exists) need a jwm restart to take effect. changes done to scripts placed in the path (for example, in /root/my-applications/bin) will be immediately reflected in the key, icon, menu item, or button that calls them.
as for the program/file choices, you can swap out termit for Urxvt or Rxvt if you don't feel like installing it. it allows copy and paste without having to use middle click through shortcut keys and the right click menu (tip: if you don't have a middle button, you can press left and right together for the same effect in rxvt/urxvt).
Control+Shift+Alt + Spacebar opens Geany and most of the files you may need to touch if following this thread. I also added notes and scrap--voila!, now it's a note-taking app. if any of the files are already opened in geany, the others will just be added to them. as to the two scrap files, you can use them as they're labeled, or you can also use them to help you launch things. in geany, if you go to view > show message window and click the terminal tab, you get a terminal beneath your document into which you can paste your growing and refined list of rox ____ ___ ____ or geany ____ ____ ___----that stuff can also be used for "menu items" when copied into .pexec_history or .gexec_history.
for rox, i chose what i thought would be useful or what's been brought up in the thread. simple to open to root, but you need to use an additional finger to get the pairs of folders to open. as with everything, a template for you to play around with.
i included the custom.jwmrc file i need on this machine--if you insist on editing .jwmrc instead of going through the personal folders in /root/.jwmrc or the _root_.jwrc file in /etc, this is one of the easiest ways to rename it to .jwmrc when necessary. (right click >copy >delete >enter >enter is probably easier.)
to convert any of these keys into terminal shortcuts, just open a file, place
#!/bin/bash
atop, and then paste in the same code from above that sits between the ><, taking out the "exec:".
so, for example, the last one from above becomes
Code: Select all
#!/bin/bash

geany /root/.pexec_history .gexec_history /root/.gexec /root/despitethewarning.jwmrc /root/.jwmrc /root/scrap /root/notes /root/.jwmrc-tray /etc/xdg/templates/_root_.jwmrc /root/.jwm/jwmrc-personal /root/.jwm/jwmrc-personal2tip: /root/.bashrc may provide some commands worth pasting into your scrap or g(p)exec_history file.
tip2: if any of the programs fails to launch, especial at first run, check the permissions (file name should be green in a stock rox setup--if not, right click, permissions, quiet or yes) or its location (it must be in the path--enter
Code: Select all
echo $PATHenjoy.
-
Puppus Dogfellow
- Posts: 1667
- Joined: Tue 08 Jan 2013, 01:39
- Location: nyc
9 Pack Of JWM Menus
here's an easy way to get nine additional menus. 1 is left click, 2, is middle, 4 is scroll up, 5 is scroll down, 3 is already your right click menu. the others need to be anchored to something so...
Place in .jwmrc-tray or jwmrc-personal just below where you see <JWM> :
^ again, place in .jwmrc-tray or jwmrc-personal; you can omit the comment.
place in jwmrc-personal:
then run the following script (or just enter the code in a terminal):
add the following to their respective root#menu files:
fill in what ever programs, files, etc you want as per the instructions laid out in the thread. you can copy any of the entries from .jwmrc or _root_.jwmrc over or make entries for the terminal shortcuts, etc. i included the desktops and Rox bookmarks (see page 6 for Mochi's scripts to accomplish the latter) to get the menu started; just add your submenus and programs between <RootMenu onroot="#"> and </RootMenu>.
scrolling up will activate the root:4 menu and scrolling down will activate the root:5 menu. you can grab shortcut keys from (for example) tab or backspace if you don't want to rely on that method of calling them.
replace the "#" with the actual number of the root menu being populated in each root#menu file (it may seem obvious, and perhaps it is, but i actually forgot to include the line (and its complement) in the above seven-line code--apologies to any who may have been affected). on the subject of perhaps obvious but maybe worth mentioning: if you've used any of the earlier shortcuts, for example the escape keys for the panels, make sure you delete or overwrite conflicts when replacing them with new versions--little things like that tend to jam things up. run jwm -p in a terminal and you'll get a a readout of any existing problems and where they can be found.
another thing that may be obvious relates to what i mentioned earlier about the left and right click together functioning as a middle click--for about three years, the workaround had me occasionally sitting around like a spazz trying to coordinate the action with my two index fingers on my laptop's trackpad buttons--much easier to just place your finger between the two and press.

edit: i tried to make it easier by including ready-made versions of the 9 root menus suggested above. i included instructions, Mochi's script from page 6, the code that needs to be pasted into the two jwm files, and the little geany script to gather together some of the files you might need:
jwmmenu9pack.tar.gz
The pack above assumes you are going to want to keep your new menu files in /root. if you're keen on changing the location, change the
lines (that you added to either /root/.jwmrc-tray or /root/.jwm/jwmrc-personal) to accurately reflect your chosen location(s).
___
a bit more on this, root menus, and shortcut keys here.
Place in .jwmrc-tray or jwmrc-personal just below where you see <JWM> :
Code: Select all
<Include>/root/root0menu</Include>
<Include>/root/root1menu</Include>
<Include>/root/root2menu</Include>
<Include>/root/root4menu</Include>
<Include>/root/root5menu</Include>
<Include>/root/root6menu</Include>
<Include>/root/root7menu</Include>
<Include>/root/root8menu</Include>
<Include>/root/root9menu</Include>

<!-- <TrayButton label="1">root:1</TrayButton> -->
<!-- <TrayButton label="2">root:2</TrayButton> -->
<!-- <TrayButton label="4">root:4</TrayButton> -->
<!-- <TrayButton label="5">root:5</TrayButton> -->
<!-- <TrayButton label="6">root:6</TrayButton> -->
<!-- <TrayButton label="7">root:7</TrayButton> -->
<!-- <TrayButton label="8">root:8</TrayButton> -->
<!-- <TrayButton label="9">root:9</TrayButton> -->
<!-- <TrayButton label="0">root:0</TrayButton> -->

<!-- four and five are scroll up and down; 3 is already your main (right click) menu and one is already left click. the others need to be anchored to something to exist--either shortcut keys or these buttons with the comments (the "<!--" and the "-->" that "hide" the code from the machine) removed. if you're going to use taskbar buttons (rather than the escape key shortcuts suggested below), you may want to add an additional taskbar... --> place in jwmrc-personal:
Code: Select all
<Key mask="A" key="Escape">root:0</Key>
<Key mask="C" key="Escape">root:1</Key>
<Key mask="S" key="Escape">root:2</Key>
<Key mask="AC" key="Escape">root:6</Key>
<Key mask="AS" key="Escape">root:7</Key>
<Key mask="CS" key="Escape">root:8</Key>
<Key mask="SAC" key="Escape">root:9</Key>
then run the following script (or just enter the code in a terminal):
Code: Select all
#!/bin/sh

geany /root/root0menu /root/root1menu /root/root2menu /root/root4menu /root/root5menu /root/root6menu /root/root7menu /root/root8menu /root/root9menu /root/.jwmrc-tray /root/.jwm/jwmrc-personal /root/my-applications/bin/9menus

#call this one 9menus and place in /root/my-applications/bin (it could come in handy later).Code: Select all
<?xml version="1.0"?>
<JWM>
<RootMenu onroot="#">

<Desktops></Desktops>

<Include>/root/places_submenu</Include>

</RootMenu>
</JWM>scrolling up will activate the root:4 menu and scrolling down will activate the root:5 menu. you can grab shortcut keys from (for example) tab or backspace if you don't want to rely on that method of calling them.
replace the "#" with the actual number of the root menu being populated in each root#menu file (it may seem obvious, and perhaps it is, but i actually forgot to include the line (and its complement) in the above seven-line code--apologies to any who may have been affected). on the subject of perhaps obvious but maybe worth mentioning: if you've used any of the earlier shortcuts, for example the escape keys for the panels, make sure you delete or overwrite conflicts when replacing them with new versions--little things like that tend to jam things up. run jwm -p in a terminal and you'll get a a readout of any existing problems and where they can be found.
another thing that may be obvious relates to what i mentioned earlier about the left and right click together functioning as a middle click--for about three years, the workaround had me occasionally sitting around like a spazz trying to coordinate the action with my two index fingers on my laptop's trackpad buttons--much easier to just place your finger between the two and press.
edit: i tried to make it easier by including ready-made versions of the 9 root menus suggested above. i included instructions, Mochi's script from page 6, the code that needs to be pasted into the two jwm files, and the little geany script to gather together some of the files you might need:
jwmmenu9pack.tar.gz
The pack above assumes you are going to want to keep your new menu files in /root. if you're keen on changing the location, change the
Code: Select all
<Include>/root/root#menu</Include>___
a bit more on this, root menus, and shortcut keys here.
Last edited by Puppus Dogfellow on Mon 23 Feb 2015, 01:50, edited 1 time in total.
-
Puppus Dogfellow
- Posts: 1667
- Joined: Tue 08 Jan 2013, 01:39
- Location: nyc
jumped the gun...
[i raved about something unripe...]
edit: Mochi's window switcher script has been officially released
his bookmarks script is also excellent
***
edit: found this earlier:
Code: Select all
#!/bin/bash

# resizes the window to full height and 50% width and moves into upper right corner
#define the height in px of the top system-bar:
TOPMARGIN=27
#sum in px of all horizontal borders:
RIGHTMARGIN=10
# get width of screen and height of screen
SCREEN_WIDTH=$(xwininfo -root | awk '$1=="Width:" {print $2}')
SCREEN_HEIGHT=$(xwininfo -root | awk '$1=="Height:" {print $2}')
# new width and height
W=$(( $SCREEN_WIDTH / 2 - $RIGHTMARGIN ))
H=$(( $SCREEN_HEIGHT - 2 * $TOPMARGIN ))
# X, change to move left or right:
# moving to the right half of the screen:
X=$(( $SCREEN_WIDTH / 2 ))
# moving to the left:
#X=0;
Y=$TOPMARGIN
wmctrl -r :SELECT: -b remove,maximized_vert,maximized_horz && wmctrl -r :SELECT: -e 0,$X,$Y,$W,$Hhttp://unix.stackexchange.com/questions ... 228#53228.
good model of how to move and resize with wmctrl. can be made into a jwm menu or submenu...would work well with gexec or pexec's history file...
Last edited by Puppus Dogfellow on Mon 15 Sep 2014, 14:55, edited 3 times in total.
-
Puppus Dogfellow
- Posts: 1667
- Joined: Tue 08 Jan 2013, 01:39
- Location: nyc
an easy way to scoot and resize windows
windowplacementpack.tar.gz
^ unpack and place contents in /root/my-applications/bin.
place the following menu items in either one of your custom menus or in /etc/xdg/templates/._root_.jwmrc.:
restart jwm.
remember to check permissions (text is green in stock rox if all is well. right click > permissions > yes or quiet otherwise). requires wmctrl. the higher the number, the smaller a percentage it is of the screen it's on. the menu's divided into right placement and left placement, the submenus into top and bottom. you can fiddle around with the settings, or rename the individual files something more descriptive. copy the titles to your gexec history....
anyway, works as is.
enjoy.

tip: if you don't feel like going through any hassle whatsoever, just make sure they're green and keep them in a folder. clicking the script will give you the same crosshairs as the jwm menu does. same if you dragged it to the desktop or panels...
edit: i think all on a single menu may be more comfortable to use...
took a screeny before switching, or maybe in lieu of doing so. this is the above placed into my root:2 menu (i.e. it's activated by middle click in addition to the aforementioned escape key combo and a taskbar button it's got (not pictured)):
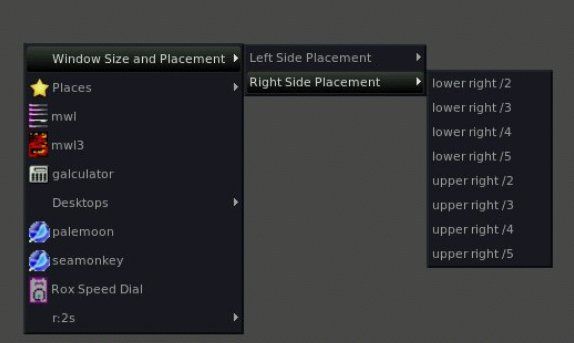
i'm going to leave the example code as a divided menu...
^ unpack and place contents in /root/my-applications/bin.
place the following menu items in either one of your custom menus or in /etc/xdg/templates/._root_.jwmrc.:
Code: Select all
<Menu label="Window Size and Placement" icon="" height="16">

<Menu label="Left Side Placement" icon="" height="16">

<Program label="upper left /2" icon="">upl2</Program>
<Program label="upper left /3" icon="">upl3</Program>
<Program label="upper left /4" icon="">upl4</Program>
<Program label="upper left /5" icon="">upl5</Program>
<Program label="lower left /2" icon="">lwl2</Program>
<Program label="lower left /3" icon="">lwl3</Program>
<Program label="lower left /4" icon="">lwl4</Program>
<Program label="lower left /5" icon="">lwl5</Program>

</Menu>

<Menu label="Right Side Placement" icon="" height="16">
<Program label="upper right /2" icon="">upr2</Program>
<Program label="upper right /3" icon="">upr3</Program>
<Program label="upper right /4" icon="">upr4</Program>
<Program label="upper right /5" icon="">upr5</Program>
<Program label="lower right /2" icon="">lwr2</Program>
<Program label="lower right /3" icon="">lwr3</Program>
<Program label="lower right /4" icon="">lwr4</Program>
<Program label="lower right /5" icon="">lwr5</Program>

</Menu>

</Menu>
remember to check permissions (text is green in stock rox if all is well. right click > permissions > yes or quiet otherwise). requires wmctrl. the higher the number, the smaller a percentage it is of the screen it's on. the menu's divided into right placement and left placement, the submenus into top and bottom. you can fiddle around with the settings, or rename the individual files something more descriptive. copy the titles to your gexec history....
anyway, works as is.
enjoy.
tip: if you don't feel like going through any hassle whatsoever, just make sure they're green and keep them in a folder. clicking the script will give you the same crosshairs as the jwm menu does. same if you dragged it to the desktop or panels...
edit: i think all on a single menu may be more comfortable to use...
took a screeny before switching, or maybe in lieu of doing so. this is the above placed into my root:2 menu (i.e. it's activated by middle click in addition to the aforementioned escape key combo and a taskbar button it's got (not pictured)):
i'm going to leave the example code as a divided menu...
-
Puppus Dogfellow
- Posts: 1667
- Joined: Tue 08 Jan 2013, 01:39
- Location: nyc
Moving and Resizing Windows On Dual Monitor Setups
...because the top half is the top half. you may need to tweak a little here and there...
jwmwindowsplacemntpack2.tar.gz
from the read me included in the above pack:
in the unlikely event that little scripts of size and placement begin to roll in, please use the above template to also include the menu item for it. all you need is text...
i'm thinking of adding stick, send to, and layers to that menu. easily adaptable between machines and can be used after upgrades. you can pass it down to your kids and grandkids...
enjoy.
jwmwindowsplacemntpack2.tar.gz
from the read me included in the above pack:
note,requires wmctrl. worked out on a 2880x900 dual monitor setup (program reads multiple monitors as one continuous screen.) most of what's here should work on a single monitor set up just as well, but some of the entries to position toward the right side do so by counting a number of pixels over from the width's midpoint. it can be fairly easily adjusted, but these instructions are in the beginning stages (most of the comments are still from the original script from http://unix.stackexchange.com/questions ... 3228#53228.
that i'm adapting to do this) so, an example:
########################################
#!/bin/bash
# upper right midpoint; a fourth (w) and third (h) of screen dimensions
#define the height in px of the top system-bar:
TOPMARGIN=7
#sum in px of all horizontal borders:
RIGHTMARGIN=10
# get width of screen and height of screen
SCREEN_WIDTH=$(xwininfo -root | awk '$1=="Width:" {print $2}')
SCREEN_HEIGHT=$(xwininfo -root | awk '$1=="Height:" {print $2}')
# new width and height
W=$(( $SCREEN_WIDTH / 4 - $RIGHTMARGIN ))
H=$(( $SCREEN_HEIGHT / 3 - $TOPMARGIN ))
# X, change to move left or right:
# moving to the right half of the screen:
X=$(( $SCREEN_WIDTH / 2 ))
#moving to the left:
#X=1444;
Y=$TOPMARGIN
wmctrl -r :SELECT: -b remove,maximized_vert,maximized_horz && wmctrl -r :SELECT: -e 0,$X,$Y,$W,$H
# on this machine, half the screen width is pretty much the same as counting across to 1400, but doing it this way is more flexible/is more likely to also work on smaller screens. anyway, you can do things like screen width / 4 - 500 or X=$(( $SCREEN_WIDTH / 2 + 800 )) and Y=$(( $SCREEN_HEIGHT / 2 - 5 )). you can add another margin and play around with all the values. learning as i go but it works. still have the original comments from the original source in most of the scripts...go by the title for a hint as to function. for left side adjustments, the number is the value of X, more or less. for the right side (denoted with a p instead of an x), it's what's added to the half value of the screen width. as with the earlier pack, the larger the number, the smaller the window selection.
#upr4x1444 is the windows placement pack script of this (title goes against suggested convention as illustration/so i would remember which one it was).
######################################
....so, the idea that this can be adjusted and expanded and turned into a community project--everybody, join in!--with somewhat self-descriptive titles and comments that explain precisely how and where...hundreds of items fit in very little space on pipe menus that can snake into one another...
anyway, if you get ten or so you like or find you frequently head back to, you can turn them into keyboard shortcuts, but you may want to change the two :SELECT:'s in the line that reads
wmctrl -r :SELECT: -b remove,maximized_vert,maximized_horz && wmctrl -r :SELECT: -e 0,$X,$Y,$W,$H
to :ACTIVE: so that it instantly acts on the window you have rather than the one you'd need to reach for and click on/activate.
############### root:1menu or place code in jwmrc-personal, _root_.jwmrc,... etc.. ###########################
<?xml version="1.0"?>
<JWM>
<RootMenu onroot="1">
<Menu label="Window Size and Placement" icon="" height="16">
<Menu label="Larger Sizes" icon="" height="16">
<Program label="Top Half" icon="">tophalf</Program>
<Program label="Half Width and Height, Middle Top" icon="">topmid3</Program>
<Program label="Left Half" icon="">lefthalf</Program>
<Program label="Right Half" icon="">righthalf</Program>
<Program label="Bottom Half" icon="">bottomhalf</Program>
<Program label="Half Width and Height, Middle Bottom" icon="">botmid3</Program>
<Separator/>
<Program label="Upper Left Quadrant" icon="">upperleftquadrant</Program>
<Program label="Upper Right Quadrant" icon="">upperrightquadrant</Program>
<Program label="Lower Left Quadrant" icon="">lowerleftquadrant</Program>
<Program label="Lower Right Quadrant" icon="">lowerrightquadrant</Program>
</Menu>
<Menu label="/3" icon="" height="16">
<Program label="Upper Left Margin" icon="">upl3</Program>
<Program label="Upper Left, 400 pixels to the Right" icon="">upl3x400 </Program>
<Program label="Upper Left, 555 pixels to the Right" icon="">upl3x555</Program>
<Program label="Upper Right, Start at Midpoint" icon="">upr3</Program>
<Program label="Upper Upper Right Margin" icon="">upr3m</Program>
<Separator/>
<Program label="Lower Left Margin" icon="">lwl3</Program>
<Program label="Lower Left, 500 pixels to the Right" icon="">lwl3x500</Program>
<Program label="Lower Right, Start at Midpoint" icon="">lwr3</Program>
<Program label="Lower Right Margin" icon="">lwr3m</Program>
</Menu>
<Menu label="Left Side Placement" icon="" height="16">
<Program label="lower left /2" icon="">lwl2</Program>
<Program label="lower left /3" icon="">lwl3</Program>
<Program label="lower left /4" icon="">lwl4</Program>
<Program label="lower left /5" icon="">lwl5</Program>
<Program label="upper left /2" icon="">upl2</Program>
<Program label="upper left /3" icon="">upl3</Program>
<Program label="upper left /4" icon="">upl4</Program>
<Program label="upper left /5" icon="">upl5</Program>
</Menu>
<Menu label="Right Side Placement" icon="" height="16">
<Program label="lower right /2" icon="">lwr2</Program>
<Program label="lower right /3" icon="">lwr3</Program>
<Program label="lower right /4" icon="">lwr4</Program>
<Program label="lower right /5" icon="">lwr5</Program>
<Program label="upper right /2" icon="">upr2</Program>
<Program label="upper right /3" icon="">upr3</Program>
<Program label="upper right /4" icon="">upr4</Program>
<Program label="upper right /5" icon="">upr5</Program>
</Menu>
<Menu label="/4" icon="" height="16">
<Program label="Upper Left Margin" icon="">upl4</Program>
<Program label="Upper Left, 444 pixels to the Right" icon="">upl4x444</Program>
<Program label="Upper Left, 888 pixels to the Right" icon="">upl4x888</Program>
<Program label="Upper Right, Start at Midpoint" icon="">upr4x1444</Program>
<Program label="Upper Right Margin" icon="">upperrightmargin4</Program>
<Separator/>
<Program label="Lower Left Margin" icon="">lwl4 </Program>
<Program label="Lower Left, 400 pixels to the Right" icon="">lwl4x400</Program>
<Program label="Lower left, 900 pixels to the Right" icon="">lwl4x900</Program>
<Program label="Lower Right, Start at Midpoint" icon="">lwr4</Program>
<Program label="Lower Right, midpt. plus 400" icon="">lwr4p400</Program>
<Program label="Lower Right Margin" icon="">lwr4rghtmrgn</Program>
</Menu>
<Menu label="/5" icon="" height="16">
<Program label="Upper Left Margin" icon="">upl5</Program>
<Program label="Upper Left, 345 pixels to the Right" icon="">upl5x345</Program>
<Program label="Upper Left, 790 pixels to the Right" icon="">upl5x790</Program>
<Program label="Upper Left, 1000 pixels to the Right" icon="">upl5x1000</Program>
<Program label="Upper Right, Start at Midpoint" icon="">upr5</Program>
<Program label="Upper Right, midpt. plus 450" icon="">upr5p450</Program>
<Program label="Upper Right, midpt. plus 950" icon="">upr5p950</Program>
<Separator/>
<Program label="Lower Left Margin" icon="">lwl5</Program>
<Program label="Lower Left, 333 pixels to the Right" icon="">lwl5x333</Program>
<Program label="Lower Left, 666 pixels to the Right" icon="">lwl5x666</Program>
<Program label="Lower Left, 999 pixels to the Right" icon="">lwl5x999</Program>
<Program label="Lower Right, Start at Midpoint" icon="">lwr5</Program>
<Program label="Lower Right, midpt. plus 300" icon="">lwr5p300</Program>
<Program label="Lower Right, midpt. plus 600" icon="">lwr5p600</Program>
<Program label="Lower Right, midpt. plus 900" icon="">lwr5p900</Program>
</Menu>
</Menu>
<Desktops></Desktops>
<Include>/root/places_submenu</Include>
</RootMenu>
</JWM>
----------------
# if you want it as a left click menu, add the above to a file called root1menu placed in /root and add the following to jwmrc.personal or .jwmrc-tray:
# <Include>/root/root1menu</Include>
# <!-- <TrayButton label="1">root:1</TrayButton> -->.
# change the 1 to 4 or 5 if you want to activate the menu by scroll up or down instead. the <Include>/root/root1menu</Include> line added to your custom.jwmrc or /etc/xdg/.../._root_.jwmrc file will add the menu to the right click/main menu. or you could just add the code to one of your custom .jwmrc files or directly to the /etc/xdg/.../._root_.jwmrc file itself.
######################################
helpful hint: alt + right click is grab and resize, alt+left click is grab and move. it may be easier in the long run...
--that may be the most important thing in there, but the lot does work well. i included the left and right menus from the previous post into this menu just to have the option. so, as usual, unpack and place the contents in root/my-applications/bin. duplicate and lengthen if you've got tons of screen real estate, post a script of the windows dancing or twirling and taking a dump if you're an expert.helpful hint: alt + right click is grab and resize, alt+left click is grab and move.
in the unlikely event that little scripts of size and placement begin to roll in, please use the above template to also include the menu item for it. all you need is text...
i'm thinking of adding stick, send to, and layers to that menu. easily adaptable between machines and can be used after upgrades. you can pass it down to your kids and grandkids...
enjoy.
-
Puppus Dogfellow
- Posts: 1667
- Joined: Tue 08 Jan 2013, 01:39
- Location: nyc
rox's missing file tree
since this thread is largely about accessing and using your files, i don't really feel it off topic when i mention alternative ways of doing so. one of the things i noticed about geany is that it actually functions as a file tree for rox, you just have to make some adjustments. firstly, go to Tools > Plugin Manager and select File Browser (i actually select all but Class Builder, but for this you only need check the File Browser tick box). next go to Edit > Plugin Preferences and check Show Hidden and Follow the path of the current file. You'll be using the bookmarks icon on the file tree to pop the view to the folder that contains the file you select, but first you have to bring up the side bar. go to Edit > Preferences > General and Edit > Preferences > Interface and select enable plugin support, show side bar, show documents list, and load virtual terminal support (good for launching programs/files). then go to the file tree (click the Files tab on the sidebar) and right click either a folder or file. then click preferences and change the "nautilus" on the external open command to "rox." now, when you right click and choose "open externally," the folder containing the file (or the folder itself if that's what you clicked) will open in rox. there's an option to save configuration and open files on exit--yet another form of bookmarks. you can put notes or scrap files about your system, set them to open in geany (a script with just the shebang and geany [path/to/files] in it), and get there again with a right click. also, there's an up arrow and home icon to aid navigation through the file tree. i'm starting to see geany as a main control center for puppy....Puppus Dogfellow wrote:
Control+Shift+Alt + Spacebar opens Geany and most of the files you may need to touch if following this thread. I also added notes and scrap--voila!, now it's a note-taking app. if any of the files are already opened in geany, the others will just be added to them. as to the two scrap files, you can use them as they're labeled, or you can also use them to help you launch things. in geany, if you go to view > show message window and click the terminal tab, you get a terminal beneath your document into which you can paste your growing and refined list of rox ____ ___ ____ or geany ____ ____ ___----that stuff can also be used for "menu items" when copied into .pexec_history or .gexec_history.
anyway, i've been tinkering with this stuff for almost three years now and have just discovered this, so i figured it may be of interest to others as well.
-
Puppus Dogfellow
- Posts: 1667
- Joined: Tue 08 Jan 2013, 01:39
- Location: nyc
getting back to windows manipulation
edit: there's an error in the portraits (maybe landscape) section of the menu in the uploaded version. if you're using these scriptlets for the jwm menu, use the code below instead. sorry for the oversight/sloppy cut-paste.
windowsmanipulationpack3.tar.gz
from the readme:
this pack lets you pick spots along the x axis or the y axis and gives another set of shapes and sizes to choose from. the code is much simpler to customize:
this will do absolutely nothing. second value gives it a position along the x axis, third down the y, fourth is the width in pixels, fifth is the height in pixels. 0 means clicking it a second time will drop it down a bit--don't know much more about what the "gravity" setting does. -1 means don't affect this parameter.
thread for and link to the repo mentioned in the readme
windowsmanipulationpack3.tar.gz
from the readme:
Code: Select all
<Menu label="Finer Tuning/Placement, Shape, Size" icon="" height="16">
<Menu label="Left to Right" icon="" height="16">

 <Program label="x=0" icon="">x0</Program>
<Program label="x=100" icon="">x100</Program>
<Program label="x=200" icon="">x200</Program>
<Program label="x=300" icon="">x300</Program>
<Program label="x=400" icon="">x400</Program>
<Program label="x=500" icon="">x500</Program>
<Program label="x=600" icon="">x600</Program>
<Program label="x=700" icon="">x700</Program>
<Program label="x=800" icon="">x800</Program>
<Program label="x=900" icon="">x900</Program>
<Menu label="more" icon="" height="16">
 <Program label="x=1000" icon="">x1000</Program>
<Program label="x=1100" icon="">x1100</Program>
<Program label="x=1200" icon="">x1200</Program>
<Program label="x=1300" icon="">x1300</Program>
<Program label="x=1400" icon="">x1400</Program>
<Program label="x=1500" icon="">x1500</Program>
<Program label="x=1600" icon="">x1600</Program>
<Program label="x=1800" icon="">x1800</Program>
<Program label="x=2000" icon="">x2000</Program>
<Program label="x=2200" icon="">x2200</Program>
  </Menu>
 </Menu>


  <Menu label="Top to Bottom" icon="" height="16">
  <Program label="y=0" icon="">y0</Program>
<Program label="y=50" icon="">y50</Program>
<Program label="y=100" icon="">y100</Program>
<Program label="y=150" icon="">y150</Program>
<Program label="y=200" icon="">y200</Program>
<Program label="y=250" icon="">y250</Program>
<Program label="y=300" icon="">y300</Program>
<Program label="y=350" icon="">y350</Program>
<Program label="y=400" icon="">y400</Program>
<Program label="y=450" icon="">y450</Program>
<Menu label="more" icon="" height="16">
<Program label="y=550" icon="">y550</Program>
<Program label="y=650" icon="">y650</Program>
<Program label="y=750" icon="">y750</Program>
<Program label="y=850" icon="">y850</Program>
<Program label="y=950" icon="">y950</Program>
   </Menu>
  </Menu>

  <Menu label="Square" icon="" height="16">
<Program label="250" icon="">250</Program>
<Program label="300" icon="">300</Program>
<Program label="350" icon="">350</Program>
<Program label="450" icon="">450</Program>
<Program label="500" icon="">500</Program>
<Program label="550" icon="">550</Program>
<Program label="650" icon="">650</Program>
<Program label="750" icon="">750</Program>
<Program label="850" icon="">850</Program>
  </Menu>

  <Menu label="Landscape" icon="" height="16">
  <Program label="w400h300" icon="">w400h300</Program>
<Program label="w450h300" icon="">w450h300</Program>
<Program label="w500h400" icon="">w500h400</Program>
<Program label="w550h400" icon="">w550h400</Program>
<Program label="w600h500" icon="">w600h500</Program>
<Program label="w650h500" icon="">w650h500</Program>
    </Menu>


  <Menu label="Portrait" icon="" height="16">
  <Program label="w300h400" icon="">w300h400</Program>
<Program label="w300h450" icon="">w300h450</Program>
<Program label="w400h500" icon="">w400h500</Program>
<Program label="w400h550" icon="">w400h550</Program>
<Program label="w500h600" icon="">w500h600</Program>
<Program label="w500h650" icon="">w500h650</Program>
  </Menu>

</Menu>

 <!--<Menu label="custom1" icon="" height="16"> -->
 <!--<Program label="custom1" icon=""></Program> -->
<!--<Program label="custom2" icon=""></Program> -->
<!-- </Menu>-->

<!--(and/or:)-->

<!-- <Key key="">exec:custom1</Key>-->
<!-- <Key mask="" key="">exec:custom2</Key>-->

<!--use the A(for :ACTIVE:) versions for keyboard shortcuts or if you want the menu to act on the active window rather than the one you'd have to select. first figure is gravity--clicking on a window that's already been positioned with the same key/menu item will result in  it dropping down by some unseen, small-but-enough-to-offset value.after that zero are the values for x axis, y axis, width, and height respectively. you can have a window of any size anywhere on the screen:

<!--(place menu in /root/.jwm/jwmrc-personal, a custom menu, or ./etc/xdg/templates/_root_.jwmrc)-->
------------------------------------------
#!/bin/sh

wmctrl -r :SELECT: -b remove,maximized_vert,maximized_horz && wmctrl -r :SELECT: -e 0,700,-1,-1,-1

#wmctrl -r :SELECT: -b remove,maximized_vert,maximized_horz && wmctrl -r :SELECT: -e 0,X,Y,W,H
# -1 means leave value unchanged
# this is x700; all it does is move the window over 700 pixels from the left. fill in the values to get a window of your requested height, width, and placement at a click.
#requires wmctrl
#change both :SELECT:s to :ACTIVE: to get instant change rather than crosshairs that will change what they click on.
#copy, move or link contents of download to /root/my-applications/bin. wouldn't take much to retitle them as terminal keycuts; scripts' titles are already short and somewhat easy to remember...
------------------------------------------
re: readme.wmp3---windows manipulation pack 3. version 4 will supersede and contain the others...the wmctrl.pet's in 1...or not; will be in 4. already in same repo folder where you found this one. premade :ACTIVE: versions may not be forthcoming....50-50....seems like something to be reserved for a personal choice of a select few keys/configurations/gridded boxes.
Code: Select all
#!/bin/sh

wmctrl -r :SELECT: -b remove,maximized_vert,maximized_horz && wmctrl -r :SELECT: -e 0,-1,-1,-1,-1thread for and link to the repo mentioned in the readme
Last edited by Puppus Dogfellow on Thu 04 Sep 2014, 12:08, edited 1 time in total.
-
Puppus Dogfellow
- Posts: 1667
- Joined: Tue 08 Jan 2013, 01:39
- Location: nyc
moving the dock and pager off the main taskbar
https://drive.google.com/file/d/0ByUDhE ... sp=sharing
^gif of two of my recent desktops. it's a bit too big for the forum and/or photobucket, but google plays it smoothly. just something showing how you can take elements out of the taskbar and move them, hide them, enlarge or shrink them, swap them out for custom images and programs, etc. i don't use conky and you can see an htop window being teleported (urxvt-set takes care of the size and shape before the start up folder launches it so -1, -1 on the last two setting in its version of the above script) to fit its place in the middle of two screens. on either side in the gif are the gifs of my netbook--breaking up the tasklist as a horizontal popup and taking the pager off the main row means you can read the items more easily on a crowded screen. JWM only allows one instance of the dock (the thing that holds the dropbox, clipper, partview, xload, and network icons) but you can have as many of the others as you like.
not sure why a six shot gif was 48 kb on my precise 571 install (the netbook) and a ten was a 480 on the 5.5 but...taken rather easily with SFR's T.A.S. 1.6. my first gif.
the image is from two monitors of different sizes aligned by their tops. from the chair the screens line up/everything below the border made by the thinner lower right hand taskbar is invisible.
if you've pasted the windows placement scripts in a path, you could use the following pasted into .gexec-history or .pexec-history as an easy way to call them. if you use the terminal, gexec, or pexec, you have to use the :SELECT: versions of the scripts because it would otherwise resize/relocate the terminal or gexec/pexec popup window itself. same if you decided to keep a rox folder to call them, though you could conveniently include a stick and layer script in the folder so that it became a sort of floating toolbar, one that you can place at a click. anyway, without further ado, your pexec/gexec meu for windows placement and resizing:
yeah, it's just the names of the scripts each on its own line. you can rename the script/entry to make it clearer or quicker to type. just change it in both locations. the panels, shortcut keys, taskbar buttons, and jwm menu items can all use the :ACTIVE: versions of the scripts. you can also drag them to the desktop and have them work on the active window (rather than reposition and deform the desktop icon).
---------
for the taskbars shown in the gif, the basic change comes at the top. these are for the four non-standard taskbars on the dual screen setup:
/root/traylvert:
from /root/bottomtrayr:
/root/toprighttrayr2:
from /root/bottomtrayr2:
and
added to jwmrc-personal. you must comment out your original dock for the new one to show, so in /root/.jwmrc-tray, place the <!-- and --> around <Dock/> or delete the line.
^gif of two of my recent desktops. it's a bit too big for the forum and/or photobucket, but google plays it smoothly. just something showing how you can take elements out of the taskbar and move them, hide them, enlarge or shrink them, swap them out for custom images and programs, etc. i don't use conky and you can see an htop window being teleported (urxvt-set takes care of the size and shape before the start up folder launches it so -1, -1 on the last two setting in its version of the above script) to fit its place in the middle of two screens. on either side in the gif are the gifs of my netbook--breaking up the tasklist as a horizontal popup and taking the pager off the main row means you can read the items more easily on a crowded screen. JWM only allows one instance of the dock (the thing that holds the dropbox, clipper, partview, xload, and network icons) but you can have as many of the others as you like.
not sure why a six shot gif was 48 kb on my precise 571 install (the netbook) and a ten was a 480 on the 5.5 but...taken rather easily with SFR's T.A.S. 1.6. my first gif.
the image is from two monitors of different sizes aligned by their tops. from the chair the screens line up/everything below the border made by the thinner lower right hand taskbar is invisible.
if you've pasted the windows placement scripts in a path, you could use the following pasted into .gexec-history or .pexec-history as an easy way to call them. if you use the terminal, gexec, or pexec, you have to use the :SELECT: versions of the scripts because it would otherwise resize/relocate the terminal or gexec/pexec popup window itself. same if you decided to keep a rox folder to call them, though you could conveniently include a stick and layer script in the folder so that it became a sort of floating toolbar, one that you can place at a click. anyway, without further ado, your pexec/gexec meu for windows placement and resizing:
Code: Select all
250
300
350
450
500
550
650
750
850
w300h400
w300h450
w400h300
w400h500
w400h550
w450h300
w500h400
w500h600
w500h650
w550h400
w600h500
w650h500
x0
x100
x1000
x1100
x1200
x1300
x1400
x1500
x1600
x1800
x200
x2000
x2200
x300
x400
x500
x600
x700
x800
x900
y0
y100
y150
y200
y250
y300
y350
y400
y450
y50
y550
y650
y750
y850
y950
lwl2
lwl3
lwl4
lwl5
lwr2
lwr3
lwr4
lwr5
upl2
upl3
upl4
upl5
upr2
upr3
upr4
upr5
sp950
botmid3
bottomhalflefthalf
lowerleftquadrant
lowerrightquadrant
lwl3
lwl3x500
lwl4
lwl4x400
lwl4x900
lwl5
lwl5x333
lwl5x666
lwl5x999
lwr3
lwr3m
lwr4
lwr4p400
lwr4rghtmrgn
lwr5
lwr5p300
lwr5p600
lwr5p900
righthalf
tophalf
topmid3
upl3
upl3x400
upl3x555
upl4
upl4x444
upl4x888
upl5
upl5x1000
upl5x345
upl5x790
upperleftquadrant
upperrightmargin4
upperrightquadrant
upr3
upr3m
upr3tomargin
upr4x1444
upr5
upr5p450
upr5p950---------
for the taskbars shown in the gif, the basic change comes at the top. these are for the four non-standard taskbars on the dual screen setup:
/root/traylvert:
Code: Select all
<JWM>
	<Tray  autohide="true" insert="right" x="0" y="58" border="1" width="230"  layout="vertical">


<Pager/>
<Tasklist/>

	</Tray>
</JWM>
Code: Select all
<JWM>
	<Tray  autohide="false" insert="right" x="1641" y="-1" border="1" height="30" valign="bottom">

<Dock/>
[...]

<Tasklist/>
[...]
	</Tray>
</JWM>
Code: Select all
<JWM>
	<Tray  autohide="true" insert="right" x="2168" y="-1" border="1" height="55" valign="top">

<Pager/>

	</Tray>
</JWM>
Code: Select all
<JWM>
	<Tray  autohide="true" insert="right" x="1965" y="-1" border="1" height="45" valign="bottom">
[...]
<Pager/>
[...]

	</Tray>
</JWM>
Code: Select all
<!-- Personally configurable options for JWM: these override default settings and theme settings -->

<JWM>

 <Include>/root/traylvert</Include>
 <Include>/root/bottomtrayr</Include>
  <Include>toprighttrayr2</Include>
<Include>/root/bottomtrayr2</Include>-
Puppus Dogfellow
- Posts: 1667
- Joined: Tue 08 Jan 2013, 01:39
- Location: nyc
a compressed folder containing the 3 windows manipulation
here's wmp4.tar.gz.version 4 will supersede and contain the others
one of the updated readmes:
the rest of the menu it refers to:edit, 9/14: reupping the nwpt (nooby word processing toolbar) as a jwm menu and as part of a larger collection. scripts will still work if just clicked on. thanks miriam..., and thanks MochiMoppel, since this is now part of the 9menu pack, each of which (in its base form) has a rox bookmarks menu thanks to a script he wrote.
some tips: ctrl+b gets you access to the bookmarks in rox, forward slash navigates by path/file name, and back slash functions like a right click. bookmark folders with control +#(up to ten (0-9); return by pressing the number from with a rox folder.) alt + right click grabs and resizes windows, alt plus left click grabs and moves windows. you can grab and move the the little windows in the pager with a right click.
the nwp series requires xdotool.pet, which has been included.
--------------------
<b>okay, a test ofthe nooby inspired</b>
word processor, really a script by miriam with
a few characters substituted here and there
you get bold
<sup>super</sup>
<sub>sub</sub>
<b>big</b>
<small><b>small</b></small>
<b><i>strikethrough</i></b>
<i>italics</i>
okay, it works really well. drag the icons to the desktop or a panel, highlight what you want formatted, click the appropriate icon/modification/script/....
..................
add [nwpb nwpbig nwpi nwpsm nwpstrk nwpsub nwpsup nwpu] to /root/my-applications/bin. add the following to one of the root#menus or to /etc/xdg/templates/._root_.jwmrc. it's been made part of the root1 (left click menu) in the pack already.
<Menu label="NWPT" icon="" height="16">
<Program label="Bold" icon="">nwpb</Program>
<Program label="Italics" icon="">nwpi</Program>
<Program label="Underline" icon="">nwpu</Program>
<Program label="Subscript" icon="">nwpsub</Program>
<Program label="Superscript" icon="">nwpsup</Program>
<Program label="Strikethrough" icon="">nwpstrk</Program>
<Program label="Big" icon="">nwpbig</Program>
<Program label="Small" icon="">nwpsm</Program>
<Menu label="supplemental" icon="" height="16">
<Program label="1" icon=""></Program>
<Program label="2" icon=""></Program>
<Program label="3" icon=""></Program>
<Program label="4" icon=""></Program>
<Program label="5" icon=""></Program>
</Menu>
<Menu label="other" icon="" height="16">
<Program label="NoteCase notes manager" icon="notecase16.xpm">notecase</Program>
<Program label="Pfind file finder" icon="mini-search.xpm">pfind</Program>
<Program label="Pdict online dictionary" icon="mini-book1.xpm">pdict</Program>
<Program label="Geany text editor" icon="geany.png">geany</Program>
<Program label="Leafpad text editor" icon="leafpad.png">leafpad</Program>
<Program label="LibreOffice 4.3" icon="/usr/share/icons/hicolor/48x48/apps/libreoffice4.2-startcenter.png">libreoffice4.2</Program>
<Program label="LibreOffice 4.3 Writer" icon="/usr/share/icons/hicolor/48x48/apps/libreoffice4.3-writer.png">libreoffice4.3 --writer</Program>
<Program label="SeaMonkey Composer html editor" icon="seamonkey16.xpm">mozedit</Program>
<!--some copy-paste to hopefully increase utility. you can customize the menu by grabbing entries from /root/.jwmrc. these are just some suggestions...i think of the custom menu items as more for loading up geany or rox, or perhaps for custom windows placement/sizing...-->
</Menu>
</Menu>
Code: Select all
<?xml version="1.0"?>
<JWM>
<RootMenu onroot="1">


 <Program label="Stick">wmctrl -r :SELECT: -b add,sticky</Program>
 <Program label="Unstick">wmctrl -r :SELECT: -b remove,sticky</Program>

 <Menu label="Layer">
   <Program label="below">wmctrl -r :SELECT: -b add,below</Program>
   <Program label="normal">wmctrl -r :SELECT: -b remove,above,below</Program>
   <Program label="above">wmctrl -r :SELECT: -b add,above</Program>
 </Menu>

<Menu label="Window Size and Placement" icon="" height="16">

<Menu label="Larger Sizes" icon="" height="16">
<Program label="Top Half" icon="">tophalf</Program>

<Program label="Bottom Half" icon="">bottomhalf</Program>
<Program label="Left Half" icon="">lefthalf</Program>
<Program label="Right Half" icon="">righthalf</Program>
<Program label="Half Width and Height, Middle Top" icon="">topmid3</Program>
<Program label="Half Width and Height, Center" icon="">centermid3</Program>
<Program label="Half Width and Height, Middle Bottom" icon="">botmid3</Program>
<Separator/>
<Program label="Upper Left Quadrant" icon="">upperleftquadrant</Program>
<Program label="Upper Right Quadrant" icon="">upperrightquadrant</Program>
<Program label="Lower Left Quadrant" icon="">lowerleftquadrant</Program>
<Program label="Lower Right Quadrant" icon="">lowerrightquadrant</Program>
</Menu>

<Menu label="/3" icon="" height="16">
<Program label="Upper Left Margin" icon="">upl3</Program>
<Program label="Upper Left, 400 pixels to the Right" icon="">upl3x400 </Program>
<Program label="Upper Left, 555 pixels to the Right" icon="">upl3x555</Program>
<Program label="Upper Right, Start at Midpoint" icon="">upr3</Program>
<Program label="Upper Upper Right Margin" icon="">upr3m</Program>
<Separator/>
<Program label="Lower Left Margin" icon="">lwl3</Program>
<Program label="Lower Left, 500 pixels to the Right" icon="">lwl3x500</Program>
<Program label="Lower Right, Start at Midpoint" icon="">lwr3</Program>
<Program label="Lower Right Margin" icon="">lwr3m</Program>
</Menu>

<Menu label="Left Side Placement" icon="" height="16">
<Program label="lower left /2" icon="">lwl2</Program>
<Program label="lower left /3" icon="">lwl3</Program>
<Program label="lower left /4" icon="">lwl4</Program>
<Program label="lower left /5" icon="">lwl5</Program>
<Program label="upper left /2" icon="">upl2</Program>
<Program label="upper left /3" icon="">upl3</Program>
<Program label="upper left /4" icon="">upl4</Program>
<Program label="upper left /5" icon="">upl5</Program>
</Menu>

<Menu label="Right Side Placement" icon="" height="16">
<Program label="lower right /2" icon="">lwr2</Program>
<Program label="lower right /3" icon="">lwr3</Program>
<Program label="lower right /4" icon="">lwr4</Program>
<Program label="lower right /5" icon="">lwr5</Program>
<Program label="upper right /2" icon="">upr2</Program>
<Program label="upper right /3" icon="">upr3</Program>
<Program label="upper right /4" icon="">upr4</Program>
<Program label="upper right /5" icon="">upr5</Program>
</Menu>

<Menu label="/4" icon="" height="16">
<Program label="Upper Left Margin" icon="">upl4</Program>
<Program label="Upper Left, 444 pixels to the Right" icon="">upl4x444</Program>
<Program label="Upper Left, 888 pixels to the Right" icon="">upl4x888</Program>
<Program label="Upper Right, Start at Midpoint" icon="">upr4x1444</Program>
<Program label="Upper Right Margin" icon="">upperrightmargin4</Program>
<Separator/>
<Program label="Lower Left Margin" icon="">lwl4 </Program>
<Program label="Lower Left, 400 pixels to the Right" icon="">lwl4x400</Program>
<Program label="Lower left, 900 pixels to the Right" icon="">lwl4x900</Program>
<Program label="Lower Right, Start at Midpoint" icon="">lwr4</Program>
<Program label="Lower Right, midpt. plus 400" icon="">lwr4p400</Program>
<Program label="Lower Right Margin" icon="">lwr4rghtmrgn</Program>
</Menu>

<Menu label="/5" icon="" height="16">
<Program label="Upper Left Margin" icon="">upl5</Program>
<Program label="Upper Left, 345 pixels to the Right" icon="">upl5x345</Program>
<Program label="Upper Left, 790 pixels to the Right" icon="">upl5x790</Program>
<Program label="Upper Left, 1000 pixels to the Right" icon="">upl5x1000</Program>
<Program label="Upper Right, Start at Midpoint" icon="">upr5</Program>
<Program label="Upper Right, midpt. plus 450" icon="">upr5p450</Program>
<Program label="Upper Right, midpt. plus 950" icon="">upr5p950</Program>
<Separator/>
<Program label="Lower Left Margin" icon="">lwl5</Program>
<Program label="Lower Left, 333 pixels to the Right" icon="">lwl5x333</Program>
<Program label="Lower Left, 666 pixels to the Right" icon="">lwl5x666</Program>
<Program label="Lower Left, 999 pixels to the Right" icon="">lwl5x999</Program>
<Program label="Lower Right, Start at Midpoint" icon="">lwr5</Program>
<Program label="Lower Right, midpt. plus 300" icon="">lwr5p300</Program>
<Program label="Lower Right, midpt. plus 600" icon="">lwr5p600</Program>
<Program label="Lower Right, midpt. plus 900" icon="">lwr5p900</Program>
</Menu>

</Menu>


 <Menu label="Send To" icon="" height="16">
   <Program label="1">wmctrl -r :SELECT: -t0</Program>
   <Program label="2">wmctrl -r :SELECT: -t1</Program>
      <Program label="3">wmctrl -r :SELECT: -t2</Program>
   <Program label="4">wmctrl -r :SELECT: -t3</Program>
      <Program label="5">wmctrl -r :SELECT: -t4</Program>
   <Program label="6">wmctrl -r :SELECT: -t5</Program>
      <Program label="7">wmctrl -r :SELECT: -t6</Program>
   <Program label="8">wmctrl -r :SELECT: -t7</Program>
      <Program label="9">wmctrl -r :SELECT: -t8</Program>
   <Program label="10">wmctrl -r :SELECT: -t9</Program>
    <Program label="Stick/Unstick">wmctrl -r :SELECT: -b toggle,sticky</Program>
 </Menu>

  <Menu label="NWPT" icon="" height="16">

<Program label="Bold" icon="">nwpb</Program>
<Program label="Italics" icon="">nwpi</Program>
<Program label="Underline" icon="">nwpu</Program>
<Program label="Subscript" icon="">nwpsub</Program>
<Program label="Superscript" icon="">nwpsup</Program>
<Program label="Strikethrough" icon="">nwpstrk</Program>
<Program label="Big" icon="">nwpbig</Program>
<Program label="Small" icon="">nwpsm</Program>
  <Menu label="supplemental" icon="" height="16">
  <Program label="1" icon=""></Program>
<Program label="2" icon=""></Program>
<Program label="3" icon=""></Program>
<Program label="4" icon=""></Program>
<Program label="5" icon=""></Program>
  </Menu>
  <Menu label="other" icon="" height="16">
<Program label="NoteCase notes manager" icon="notecase16.xpm">notecase</Program>
<Program label="Pfind file finder" icon="mini-search.xpm">pfind</Program>
<Program label="Pdict online dictionary" icon="mini-book1.xpm">pdict</Program>
<Program label="Geany text editor" icon="geany.png">geany</Program>
<Program label="Leafpad text editor" icon="leafpad.png">leafpad</Program>
<Program label="LibreOffice 4.3" icon="/usr/share/icons/hicolor/48x48/apps/libreoffice4.2-startcenter.png">libreoffice4.2</Program>
<Program label="LibreOffice 4.3 Writer" icon="/usr/share/icons/hicolor/48x48/apps/libreoffice4.3-writer.png">libreoffice4.3 --writer</Program>
<Program label="SeaMonkey Composer html editor" icon="seamonkey16.xpm">mozedit</Program>
<!--some copy-paste to hopefully increase utility. you can customize the menu by grabbing entries from /root/.jwmrc. these are just some suggestions...-->

  </Menu>
   </Menu>


  <Menu label="r:1s" icon="" height="16">

<Program label="close rox windows" icon="">closeallrox</Program>
<Program label="close current instances" icon="">cadi</Program>

  </Menu>
<Desktops></Desktops>

<Include>/root/places_submenu</Include>

</RootMenu>
</JWM>
-
Puppus Dogfellow
- Posts: 1667
- Joined: Tue 08 Jan 2013, 01:39
- Location: nyc
speed arrows for windows placement
the code to be added to jwmrc-personal:
the four mini scripts to be placed in my-applications/bin:
these will allow Alt+[the arrow keys] to rapidly scoot windows across the desktop. the program/script needed some adjustments to follow a straight line, possibly because of the default gravity of windows. so, taking the last one as an example, it will in fact move 70 pixels to the right with each press (and at the default repeat rate after the default delay), but those 35 pixels on the y axis are just an adjustment to keep it from falling down a few for every hundred or so it moves across.
Code: Select all
<Key mask="A" key="Up">exec:supup</Key>
<Key mask="A" key="Down">exec:supdown</Key>
<Key mask="A" key="Right">exec:supright</Key>
<Key mask="A" key="Left">exec:supleft</Key>
Code: Select all
supdown:

#!/bin/bash

wid=`xdotool getactivewindow`

eval `xdotool getwindowgeometry --shell $wid`
Y=$(($Y + 60))
X=$(($X - 5))
xdotool windowmove $wid $X $Y
-----------------
supup:

#!/bin/bash

wid=`xdotool getactivewindow`

eval `xdotool getwindowgeometry --shell $wid`
X=$(($X - 5))
Y=$(($Y - 60))
xdotool windowmove $wid $X $Y

-----------------
supleft:

#!/bin/bash

wid=`xdotool getactivewindow`

eval `xdotool getwindowgeometry --shell $wid`
X=$(($X - 70))
Y=$(($Y - 35))
xdotool windowmove $wid $X $Y

-----------------
supright:

#!/bin/bash

wid=`xdotool getactivewindow`

eval `xdotool getwindowgeometry --shell $wid`
X=$(($X + 70))
Y=$(($Y - 35))
xdotool windowmove $wid $X $Y
-
Puppus Dogfellow
- Posts: 1667
- Joined: Tue 08 Jan 2013, 01:39
- Location: nyc
i've decided to use 20 shortcut keys for windows placement
what the scripts do:
a1 -- upper left quadrant of left screen
a2 -- upper right quadrant of left screen
a3 -- lower left quadrant of left screen
a4 -- lower right quadrant of left screen
a5 -- quadrant-sized window placed at center of left screen
a6 -- upper left quadrant of right screen
a7 -- upper right quadrant of right screen
a8 -- lower left quadrant of right screen
a9 -- lower right quadrant of right screen
a10 -- quadrant-sized window placed at center of right screen
b1 -- left half of left screen
b2 -- right half of left screen
b3 -- top half of left screen
b4 -- bottom half of left screen
b5 -- full screen left
b6 -- left half of right screen
b7 -- right half of right screen
b8 -- top half of right screen
b9 -- bottom half of right screen
b10 -- full screen right
using the template
and the wmctrl -l -G command (wg if you have the terminal shortcuts pack(s) installed), you can pretty easily customize and more or less automate window size and placement. use -1 if you don't want the values of a given parameter changed in your version of the scripts. what you do is place windows (preferably ones with unique titles (rox works well for this) as that will make it easier to pick them out of the readout wmctrl -l -G gives) all about your desktop. once you've placed and sized them how and where you think you'll want future windows to appear, enter the window list and geometry command (wg/wmctrl -l -G) into a terminal and just copy the values into your scripts. it should look something like this:
the numbers we need are in the 3rd, 4th, 5th, and 6th column and are in the same order we need to put them into our code from above. so if i wanted to be able to instantly have a window mimic the present behavior of the xpad window "6" from above, the code would be:
use no spaces between the values or the commas. that first number (after the 0x business) from the wmctrl -l -G readout is not gravity but desktop--you pull the figures after it in order. again, if you want the general behavior but not the [x placement/y placement/width/height], substitute -1 for that value.
here are my 20 shortcuts from jwmrc-personal:
20packOplacement.tar.gz
edited so that b1-4 are no longer the same as b6-9
edit 2, updated pack available:
PlacementPack2
info and screenshots
a1 -- upper left quadrant of left screen
a2 -- upper right quadrant of left screen
a3 -- lower left quadrant of left screen
a4 -- lower right quadrant of left screen
a5 -- quadrant-sized window placed at center of left screen
a6 -- upper left quadrant of right screen
a7 -- upper right quadrant of right screen
a8 -- lower left quadrant of right screen
a9 -- lower right quadrant of right screen
a10 -- quadrant-sized window placed at center of right screen
b1 -- left half of left screen
b2 -- right half of left screen
b3 -- top half of left screen
b4 -- bottom half of left screen
b5 -- full screen left
b6 -- left half of right screen
b7 -- right half of right screen
b8 -- top half of right screen
b9 -- bottom half of right screen
b10 -- full screen right
using the template
Code: Select all
#!/bin/sh

wmctrl -r :ACTIVE: -b remove,maximized_vert,maximized_horz && wmctrl -r :ACTIVE: -e 0,,,,

#[ 0,X,Y,W,H--fill in the spaces to match the values]Code: Select all
0x0220002c  0 853  672  748  530  puppypc27232 bl
0x02200029  0 830  50   771  532  puppypc27232 6
0x0220001a -1 14   54   780  504  puppypc27232 3
0x02200037 0 29 55 1417 403 puppypc27232 wwwCode: Select all
#!/bin/sh

wmctrl -r :ACTIVE: -b remove,maximized_vert,maximized_horz && wmctrl -r :ACTIVE: -e 0,830,50,771,532
here are my 20 shortcuts from jwmrc-personal:
Code: Select all
<Key mask="SC" key="1">exec:a1</Key>
<Key mask="SC" key="2">exec:a2</Key>
<Key mask="SC" key="3">exec:a3</Key>
<Key mask="SC" key="4">exec:a4</Key>
<Key mask="SC" key="5">exec:a5</Key>
<Key mask="SC" key="6">exec:a6</Key>
<Key mask="SC" key="7">exec:a7</Key>
<Key mask="SC" key="8">exec:a8</Key>
<Key mask="SC" key="9">exec:a9</Key>
<Key mask="SC" key="0">exec:a10</Key>


<Key mask="SA" key="1">exec:b1</Key>
<Key mask="SA" key="2">exec:b2</Key>
<Key mask="SA" key="3">exec:b3</Key>
<Key mask="SA" key="4">exec:b4</Key>
<Key mask="SA" key="5">exec:b5</Key>
<Key mask="SA" key="6">exec:b6</Key>
<Key mask="SA" key="7">exec:b7</Key>
<Key mask="SA" key="8">exec:b8</Key>
<Key mask="SA" key="9">exec:b9</Key>
<Key mask="SA" key="0">exec:b10</Key>edited so that b1-4 are no longer the same as b6-9
edit 2, updated pack available:
PlacementPack2
info and screenshots
Last edited by Puppus Dogfellow on Fri 06 Mar 2015, 15:44, edited 2 times in total.
-
Puppus Dogfellow
- Posts: 1667
- Joined: Tue 08 Jan 2013, 01:39
- Location: nyc
addtitional taskbars
i find that taking the dock and pager off the main taskbar makes a screen feel more spacious, especially on a netbook. below are my mods to jwmrc-personal and most of the additional trays in their entirety (missing the six buttons on the more central upper tray. it was the first additional tray i made and it's a relocated and largely commented out version of the original. the main change is the x coordinate and the vertical alignment (valign) swap to "top." no need to comment out if you don't include to begin with). that bit at the end of the personal file gives one pixel spacers around the left, right, and top (bottom's been commented out) of your (essentially) maximized window, so you can still click on the wall paper to get your root:3 menu, and in the case of what's here, the root 1, 2, 4, and 5 menus as well. the windows relocation menu can be set to move windows to the actual edges of the screen, making them easy to access without having to minimize anything else or hit the showdesktop button.
mods to jwmrc-personal:
Code: Select all
<!-- Personally configurable options for JWM: these override default settings and theme settings -->

<JWM>

  <Include>/root/traytopdll2</Include>
  <Include>/root/traytopdll3</Include>.
 <Include>/root/verttrayr</Include>
 <Include>/root/verttray1</Include>
 <Include>/root/root1menu</Include>
 <Include>/root/root0menu</Include>
<Include>traymidbotdll</Include>
<Include>/root/root2menu</Include>
<Include>/root/root4menu</Include>
<Include>/root/root5menu</Include>
<Include>/root/root6menu</Include>
<Include>/root/root7menu</Include>
<Include>/root/root8menu</Include>
<Include>/root/root9menu</Include>

   <Tray x="200" y="1">
      <Spacer width="1" height="1"/>
   </Tray>
#t


   <Tray x="1" y="200">
      <Spacer width="1" height="1"/>
   </Tray>
#l

   <Tray x="-1" y="200">
      <Spacer width="1" height="1"/>
   </Tray>
   #r

<Tray x="200" y="-29">
      <Spacer width="1" height="1"/>
   </Tray>
#d


#   <Tray x="200" y="-1">
#      <Spacer width="1" height="1"/>
#   </Tray>
#d

</JWM>
trays included:
Code: Select all
traytopdll2:

<JWM>
<Include>/root/root2menu</Include>

	<Tray  autohide="true" insert="right" x="32" y="1" border="1" height="15" font="10" valign="top" >

<TrayButton label="1">root:1</TrayButton>
<TrayButton label="2">root:2</TrayButton>
<TrayButton label="3">root:3</TrayButton>
<TrayButton label="4">root:4</TrayButton>

<TrayButton label="5">root:5</TrayButton>

<TrayButton label="6">root:6</TrayButton>
<TrayButton label="7">root:7</TrayButton>
<TrayButton label="8">root:8</TrayButton>
<TrayButton label="9">root:9</TrayButton>
<TrayButton label="0">root:0</TrayButton>

	</Tray>
</JWM>

--------
traytopdll3
<JWM>

	<Tray  autohide="true" insert="right" x="345" y="1" border="1" height="33" valign="top" >

			<TrayButton label="" popup="ccdi" icon="/root/ccdi.png">exec:ccdi</TrayButton>
	<TrayButton label="" icon="/root/puppy-reference/midi-icons/bookmarks.png">exec:3r</TrayButton>


	<TrayButton popup="Run commandline" label="l" icon="" >exec:gexec</TrayButton>
	</Tray>
</JWM>


--------
verttrayr
<JWM>
	<Tray  autohide="true" insert="right" layout="vertical" x="800" y="10" border="1" width="224" >

<Pager/>
<TaskList/>
</Tray>
</JWM>
--------

verttray1

<JWM>
	<Tray  autohide="true" insert="right"  layout="vertical" x="0" y="1" border="1" width="26" >
	 <Dock/>
	<TaskList/>
	</Tray>
</JWM>
--------
traymidbotdll:

<JWM>


	<Tray  autohide="true" insert="right" x="322" y="1" border="1" height="43" valign="bottom" >


		<Pager/>

	</Tray>
</JWM>
***
bonus, click mouse keys from the terminal:
Code: Select all
#!/bin/sh

xdotool click 1

#name this one (as an example of something short and adequately descriptive (these three scripts require xdotool)) xl and place in /root/my-applications/bin
#left click

#!/bin/sh

xdotool click 2

#name this one xm and place in /root/my-applications/bin
#middle click

#!/bin/sh

xdotool click 3

#name this one xr and place in /root/my-applications/bin
#right click
comes in pretty handy on a netbook lacking a middle click button. can be made into shortcut keys, but if you want to be able to press and hold, you'll need to sacrifice extra buttons (for down and then release--those take over your cursor and so are not really suited for the terminal). thus far, not a particularly well employed idea, but it's a potentially useful one. xm's good for pasting highlighted text into the terminal, i guess, but i think c2 (for click 2) is a better name for it.
here's the documentation for xdotool.
Last edited by Puppus Dogfellow on Wed 22 Apr 2015, 03:19, edited 2 times in total.
-
Puppus Dogfellow
- Posts: 1667
- Joined: Tue 08 Jan 2013, 01:39
- Location: nyc
the pinboards as workspaces/menus/fields of bookmarks
wnsdpn.tar.gz
here's the readme from the above .gz:
anyway, you can drag folders, scripts, files, etc. to a "desktop" and have that called forward or put away at a key press. hope someone finds it useful. if you're adventurous or bored, you can make the pinboard scripts fire whenever a desktop is switched with the information in this thread.
____
late tip:
cd /root/Choices/ROX-Filer; for f in PuppyPin{2..6} ; do cp PuppyPin $f ; done
in a terminal will autogenerate the five pinboard copies.
here's the readme from the above .gz:
mwl9 and sd are forks/tweaks/hacks of two of MochiMoppel's scripts, winswitcher and speeddials. the only change to the latter is a button to call mwl9, which is unnecessary now that 3b calls/shuts off both. mwl 9 has a bug not present in the original--the open windows are listed twice. trade off is it doesn't auto close, you can refresh the list and repostion the box, and you get 14 additional buttons. colum one: refresh, moveback (might get rid of this one since i never use it. regardless, it was RSH's tweaks that gave the first two buttons and showed me how to add the other 12.) layer above, layer normal, layer below, sticky, close rox. column 2 has the same buttons as column 1 but the first is labeled with a different popup and the activation is set (mistakenly) for a program (search for "action" in the script to customize) i've never offered as it's specific to one of my setups. for the other six (my original intent was that the first on the second column would activate the p1 panel set), i'm thinking of either more panels, buttons to size and/or position selected windows, or a quick way to swap puppy/rox's pinboards. the next uploaded version of this will include a folder with the necessary scripts, better, less redundant, more function-specific buttons, and the scriplets for the quick pinboard switches, which i think are the only relevant ones missing from the wmp4..tar.gz file in pupli repo's utilities folder. xdotool and wmctrl are required for most of this stuff to work; both are available in the repo. for Slacko64, you'll need the 64bit wmctrl available in the ppm. you can grab the 64bit xdotool from the repo (utilities folder).
until they're upped in stand alone, copy-to-/root/my-applications/bin-able form, here are the mini-scripts for the pinboard switching/here's the readme that was supposed to go with the five little scripts i've decided not to upload until i get some stuff sorted out:
#!/bin/sh
#name this one pp1
rox --pinboard=/root/Choices/ROX-Filer/PuppyPin
_______________
#!/bin/sh
#name this one pp2
rox --pinboard=/root/Choices/ROX-Filer/PuppyPin2
_______________
#!/bin/sh
#name this one pp3
rox --pinboard=/root/Choices/ROX-Filer/PuppyPin3
_______________
#!/bin/sh
#name this one pp4
rox --pinboard=/root/Choices/ROX-Filer/PuppyPin4
_______________
#!/bin/sh
#name this one pp5
rox --pinboard=/root/Choices/ROX-Filer/PuppyPin5
_______________
#copy the pinboard in /root/Choices/ROX-Filer and name it PuppyPin2 or use geany to save the file as PuppyPin2, PuppyPin3, PuppyPin4, and PuppyPin5. if you want a blank slate,
#code:
# <?xml version="1.0"?>
# <pinboard>
# <backdrop style="Stretched">/usr/share/backgrounds/DarkGrey.jpg</backdrop>
# </pinboard>
#can be made into menu entries, keyboard shortcuts, or panel items. if you use them as desktop icons, you'll need to drag the scripts to each new "wallpaper" as they'll be removed with the pinboard. keep this in mind if you're using the pinboards as menus, bookmarks, or workspaces.
#to do: up the jwm code (find and alter the appropriate code) to make each desktop switch automatically switch pinboards. i figure it's a good way to make the desktops seem less virtual and more like distinct locations unto themselves. of course, i'd probably rather be able to switch the pinboards with the same ease i can their four panel frames, which is why their names are so brief--shift+space to call the terminal is a very handy shortcut. i like it, anyway. i recommend rox as the shortcut for alt+spacebar, and 3b as the shortcut for ctrl+spacebar.
# some further words about sd and mwl9/the original MochiMoppel scripts on which they are based: i place 3b (which calls/shuts down both) atop many of the root:# menus--together they function as a sort of master control center, or so it seems to me. i think their inclusion would improve just about every puppy.
p.dogfellow, 10/15/2014
anyway, you can drag folders, scripts, files, etc. to a "desktop" and have that called forward or put away at a key press. hope someone finds it useful. if you're adventurous or bored, you can make the pinboard scripts fire whenever a desktop is switched with the information in this thread.
____
late tip:
cd /root/Choices/ROX-Filer; for f in PuppyPin{2..6} ; do cp PuppyPin $f ; done
in a terminal will autogenerate the five pinboard copies.
Last edited by Puppus Dogfellow on Sun 14 Jun 2015, 17:07, edited 3 times in total.
-
MochiMoppel

- Posts: 2084
- Joined: Wed 26 Jan 2011, 09:06
- Location: Japan
Re: the pinboards as workspaces/menus/fields of bookmarks
My sincere thanks that you didn't call them "improvements"Puppus Dogfellow wrote:mwl9 and sd are forks/tweaks/hacks of two of MochiMoppel's scripts, winswitcher and speeddials
-
Puppus Dogfellow
- Posts: 1667
- Joined: Tue 08 Jan 2013, 01:39
- Location: nyc
Re: the pinboards as workspaces/menus/fields of bookmarks
no sweat, Mochi.MochiMoppel wrote:My sincere thanks that you didn't call them "improvements"Puppus Dogfellow wrote:mwl9 and sd are forks/tweaks/hacks of two of MochiMoppel's scripts, winswitcher and speeddials
thanks again for providing them.
I just want to throw an idea in the mix here - I stumbled across another thread that was discussing user interfaces for puppy, and one post in particular (from 'disciple') caught my focus in terms of improving the desktop usability. Unfortunately the image he posted isn't immediately visible due to its size, but its worth clicking the download link and having a look at it here
Maybe there's some way to offer the menus in such a way using your shortcuts Puppus?
There's some other interesting ideas spread through that thread too.
Maybe there's some way to offer the menus in such a way using your shortcuts Puppus?
There's some other interesting ideas spread through that thread too.
-
Puppus Dogfellow
- Posts: 1667
- Joined: Tue 08 Jan 2013, 01:39
- Location: nyc
looks cool, greengeek, but it seems like a keyboard shortcut to usr/share/applications would do more or less the same thing. you can symlink any missing programs or scripts to that folder and access them either with / and then the first letter(s) plus enter, or by clicking it in the same way you would disciple's panel. you could also copy and rename the items in the folder to make access easier by controlling their placement/sort order. i haven't read the whole thread, so i may be missing something, but that's my take on it. at least so far.greengeek wrote:I just want to throw an idea in the mix here - I stumbled across another thread that was discussing user interfaces for puppy, and one post in particular (from 'disciple') caught my focus in terms of improving the desktop usability. Unfortunately the image he posted isn't immediately visible due to its size, but its worth clicking the download link and having a look at it here
Maybe there's some way to offer the menus in such a way using your shortcuts Puppus?
There's some other interesting ideas spread through that thread too.
anyway, i think the puppypin switching is close to what you were talking about earlier with the time machine aspects of what's going on here. i was thinking about situations in which i'd like to have a bunch of folders ready, and when i moved from personal use to professional use, it seemed more space may be better, though as disciple points out in the linked thread, menu items and taskbar buttons (and panels) have the advantage of not being covered by other windows. so i thought about what's required the most "organization" and came back to my time as teacher--you could pop up a pinboard that has a folder for each kid, or each portfolio, one pinboard per class, or from the kid's perspective (i sometimes think about how puppy can be used in the nyc/usa school system--they've got plenty of machines that can be given new life and basically a curriculum entry point, should they choose to take advantage of the opportunity), a personal desktop plus one for each subject or project or whatever. make a mess, keep things out and handy, put it away instantly when you're finished. that's kind of how i use the panels. they become somewhat disposable over time, but both the panels and the pinboards allow easy salvage though copy-paste/deletion of the file's contents (they may want to take their drives and (etc) with them).
anyway, a large categorized panel like disciple's may appeal to some. it could be launched with a menu, key, or a button same as anything else.