Page 5 of 7

Chrome effect with mtpaint

Posted: Tue 03 May 2016, 23:58
by don570
Chrome effect with mtpaint

MtPaint doesn't have a Chrome effect but I found a solution that
results in a high quality chrome effect with no jagged edges!!

- instructions - chrome effect

-launch mtpaint
-use paintbucket to make white document image
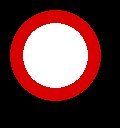
-use text tool to put large black characters in image (see below)
-save as png to disk ---> /root/image.png

Image

- use imagemagick 6.9.8 and chrome script
from Fred's site to make a chrome effect
Note: Chrome script must be in executable path


- in terminal type

Code: Select all

chrome -i 100 -n 2 -s 3 -a 135 -e 45 -c white  -b none  -d 1 -B 0 -A off  /root/image.png /root/chrome.png
---> chrome.png is output image

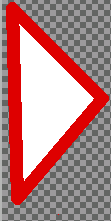
- open output file with mtpaint (see image)

Image


- add a new layer
Layer > New layer (24 bit)

Put it underneath the chrome image. (click on down arrow)

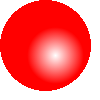
- Turn on gradient tool and put in an interesting gradient with paintbucket
Example has simple linear red-to-black gradient

- Make a composite image (see result below)
Layers > Composite to New Layer

Image

You can now delete the other layers if desired

- Make the grey color transparent

Palette > Palette editor
- use dropper and click on grey portion of image . This makes grey the color 0 (see below for example)

Image

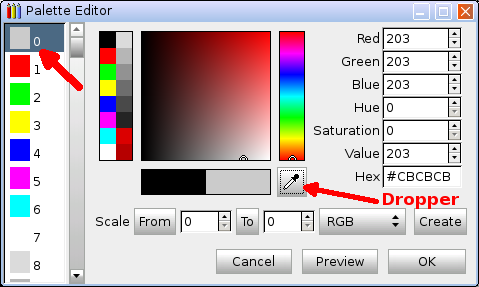
-save composite image as png with transparent color 0
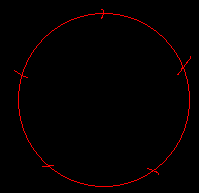
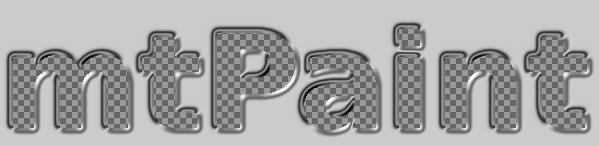
Here is the final image...

Image

The checkerboard indicates transparency.
Note that there is no jagged edges so you can use on any background
and get professional results.
_________________________________________________________

Tip : Create a random pattern that repeats without a seam

Posted: Sat 09 Jul 2016, 20:25
by don570
Tip : Create a random pattern that repeats without a seam

using mtpaint

1) Use mtpaint to open an image of a pattern that is fairly random

2)make a selection that is nearly square.


3) Crop command

4) Now make the picture square - The number of pixels must be divisible by 2 (In the example the image is 400 by 400)

Image > Scale Canvas

5) Now resize with an offset of half (see image for an example - half of 400 is 200)


Here is the result ....

6) Use smear brush to eliminate horizontal and vertical seams, but do not alter the edges of image.


7) You can now make a larger document which won't have seams
and will appear random -->
Image > Resize Canvas

________________________________________

Posted: Sat 09 Jul 2016, 20:55
by Pete
@don570

Nice tuts, please keep them coming.

Posted: Sat 09 Jul 2016, 21:28
by learnhow2code
i was already a fan before i knew it could do stuff like this.

havent found (or looked for) any info about it until i came to this forum. thanks very much.

Posted: Mon 11 Jul 2016, 19:37
by don570
I got the tip from a Blender user video. Photoshop was used
but mtpaint is nearly as good. :lol:
__________________________________

Posted: Mon 11 Jul 2016, 20:44
by don570
Here's the video about pattern painting using Blender.
Well worth watching

https://www.youtube.com/watch?v=7FobUOuISak
_______________________________________________________

Posted: Sat 23 Jul 2016, 20:33
by don570
I was able to make a default background without using a disk clipboard.
Instead I used the layers feature. (as suggested by Wjaguar)
Should be faster and safer.

Here was the first command...

Code: Select all

mtpaint --cmd  -f/open='/tmp/clock.svg'  -s/all -e/copy -e/'Save Clipboard'/9 -f/new w=1184 h=624 =24   -e/col a=0 -s/all -e/cut -e/col a=9  -e/freetype font='DejaVu Sans' antialias=0 size=70  back=-1 angle=0  -e/freetype t='Fatdog Arm 4' -e/paste  \(470,460\) -effect/gaussian=3  -e/layer trans=0 -effect/gaussian=1  -s/all -e/copy  -e/'Save Clipboard'/8 -e/set  grad=1 -e/col a=0 b=173 -e/tool grad \(300,200 700,500\) -e/tool grad: type=lin ext=mirror     -s/all -e/cut  -e/'Load Clipboard'/8  -e/paste -effect/'Soften ...'=50  -e/'Load Clipboard'/9  -e/paste  \(700,90\)  -f/as=/usr/share/backgrounds/default format=jpeg 

I modified it to the following

Code: Select all

mtpaint --cmd    -f/new w=1184 h=624 =24   -e/set  grad=1 -e/col a=0 b=173 -e/tool grad \(300,200 700,500\) \
      -e/tool grad: type=lin ext=mirror     -s/all -s/"Fill Selection"  \
         -layer/new  -f/open='/tmp/clock.svg'  -s/all -e/copy  -layer/"Remove All Layers"   -e/paste  \(700,90\) \
      -layer/new   -e/col a=9  -e/freetype font='DejaVu Sans' antialias=0 size=70  back=-1 angle=0  -e/freetype t="Fatdog Arm"\
        -e/paste  \(470,460\) -effect/gaussian=3  -e/layer trans=0 -effect/gaussian=1 \
       -layer/"Composite to New Layer" -f/as=/usr/share/backgrounds/default format=jpeg
 

Note that -e/layer trans=0 is used to make the text layer transparent

The clock image is copied to the clipboard and the layer is removed

____________________________________________________

Posted: Sat 23 Jul 2016, 20:40
by don570
to create a layer that has the opacity at 66% and black is transparent

Code: Select all

-layer/new  -e/layer opa=66 trans=0
______________________________________________

Brush size can be set which is useful for tools like lines and circles ellipses...
However you will need to experiment for the appropriate number

Code: Select all

 -e/brush=5
_____________________

A line can be made once the size is set. (The size is one pixel by default!)

Code: Select all

-e/tool line \(74,174 612,174\)
Protect the round brackets if you are running a regular script.

Posted: Wed 27 Jul 2016, 22:51
by don570
Here some examples of using the script window...
Warning. There can be problems copying scripts from a html page so
if you are having problems then eliminate the line endings and
run the script as just one line.
Also previous settings of mtpaint may affect output. For instance if the gradient tool
is set to 'Reverse' the gradient


First example - Outline a circle

Note that the mtpaint window will show transparency, but since the
output is a jpeg image, there is blackness around the circle.

The round bracket characters don't need protection in the script window.
They do if you are running a regular script.
Note the brush size (which is intended for air brushing).

Code: Select all

-layer/new =24  -e/layer  trans=0 -e/col a=7 -s/all (10,10 100,100) -s/"Fill Ellipse" -e/brush=3  -e/col a=14 -s/all (10,10 100,100) -s/"Outline Ellipse"    -f/as=/root/image format=jpeg
Image
_____________________________________________________

A white triangle can be made by selecting a triangle then cutting (with a=7).
An "outline selection" can be added to make the red outline (a=14).

Note the brush size (which is intended for air brushing)
The output is a png file so transparency is shown with a checker pattern.

Code: Select all

-layer/new =24  -e/layer  trans=0 -e/col a=7 -s/all (10,10 100,100 15,200) -e/cut  -e/brush=3 -e/col a=14 -s/all (10,10 100,100 15,200) -s/"Outline Selection"    -f/as=/root/image2.png
Image
____________________________________________________

To put the shine on the side of a sphere, rather than the middle ---> 2 spheres were created
This required a transparent layer on the background layer.
A third composite layer was created and it was transparent as well so the png file shows transparency.

Code: Select all

-f/new w=313 h=345 =24 -e/col a=1   -s/all  (0,0 90,90) -s/"Fill Ellipse"    -layer/new  -e/layer trans=0 -e/col a=1   -e/set grad=1  -e/tool grad: type=rad ext=none grad=rgb  opac=only -e/tool grad (55,55 75,75) -e/col a=7  b=1  -s/all (0,0 200,200) -s/"Fill Ellipse" -layer/"Composite to New Layer" -e/layer  trans=0  -f/as=/root/image.png


Note that the selection -s/all (0,0 200,200) is chosen to be big enough to fit in both the spheres.

Image

_________________________________________________

Posted: Thu 28 Jul 2016, 18:07
by don570
As a comparison with the shine on side here is an example with the shine in middle. It may be simpler to write code but it doesn't look as good.

Code: Select all

-layer/new =24 -e/col a=7  b=1  -e/layer trans=0  -e/set grad=1  -e/tool grad: type=rad ext=none grad=rgb  opac=only -e/tool grad (50,50 70,70)  -e/col a=7   -s/all  (0,0 90,90)   -s/"Fill Ellipse"   -f/as=/root/image2.png
Image
_____________________________

mtpaint lines

Posted: Sat 30 Jul 2016, 18:56
by don570
Here are some examples using the line command...
Vertical or horizontal lines are simple and there is no jaggedness

Code: Select all


-e/brush=3 -e/tool line (10,10 10,100) -s/all (30,10 38,100) -e/cut

Note that the line tool makes the line have rounded ends no matter the brush
size setting. Conclusion the cut method is better and simple to code.

Image

_________________________________________________________


...But there is a problem when the line is at an angle. Jaggedness appears in both methods, but it appears worse in the cut method,
and the cut method is difficult (there's no simple rule to derive the coordinates)

Code: Select all

-e/brush=3   -e/tool line (25,25 50,85)  -s/all (40,26 45,23 96,80 90,86)  -e/cut

Image

_____________________________________________________

It is tempting to use the Free Rotate command to rotate a cut area.

Code: Select all

-layer/new  -s/all (30,10 38,100) -e/cut  -e/col a=0  -image/rotate=45
The result looks nice, because there is a slight antialiasing applied by mtpaint.
However this antialiasing causes problems when using the lasso tool
and pasting the line into another document.
I'll explain in next post.

Image
________________________________________

alpha blend command in mtpaint

Posted: Sat 30 Jul 2016, 19:35
by don570
If the background is white the rotate command still gives good results.
(See image below)

Code: Select all

-layer/new -e/col a=7   -s/all  -s/fill   -e/col a=1  -s/all (30,10 38,100) -e/cut  -e/col a=7  -image/rotate=45
Image

However in a more practical example the line must be lassoed and transfered to another document.

Here is the result magnified several times. See the black fringe affect.
Image


So here is the code that will avoid this fringe affect. It uses alpha blend,
one of the features of mtpaint.
gaussian=1 is fine to get rid of jagged edges.

Code: Select all

-layer/new -s/all (30,10 38,100) -e/cut  -e/col a=0  -image/rotate=45 -s/all  -s/"Lasso Selection"   -layer/new =24  -e/paste (10,10) -effect/gaussian=1 -s/all  -s/"Lasso Selection" -layer/new =24 -e/col a=7  -s/all  -s/"Fill Selection"  -e/col  a=1  b=0 -s/'Alpha Blend'    -e/paste   -f/as=/root/image.png
Code explanation:
- a gaussian blur can only be done with 24 bits of color so start with the
correct document
-Red horizontal line is created with cut command (or fill command if you prefer)
- a=0 ( i.e. black) is needed before rotation to fill triangle edges of rotated document.

- entire document is selected and then lassoed to clipboard.

-pasted to new layer (i.e. a new document) and jaggedness is removed with
the gaussian effect (gaussian=1 )

-red line lassoed again . It is in the clipboard again.

I made a final document (a white image)
Note I filled the document with the color white (a=7).

- -e/col a=1 b=0 was needed for the correct alpha blend procedure in this example
---> Because it was a red line with some black fringing.

- the alpha blend command is applied then finally the paste command.

Image
____________________________________________

Posted: Wed 03 Aug 2016, 00:20
by don570
Tip to make stars and other objects in mtpaint

The vertices are needed when using a script, so here is what I suggest.

Brush size ---> 1 pixel
Make a square selection with selection tool
Make a circle --->

Selection -> Outline Ellipse

Paint marks an equal space apart along circle circumference(see image)

Image

Use line tool to connect points (See image)

Image

Open text editor and note the vertices
as you hover your mouse over mtpaint window
Coordinates can be read from bottom left of mtpaint window.
Here is the results:

498 239
478 176
526 139
465 141
447 83
425 139
366 144
413 178
392 239
443 201

Now you construct the script commands

Code: Select all

-layer/new -s/all (498,239 478,176 526,139 465,141 447,83 425,139 366,144 413,178 392,239 443,201) -s/fill


Image

For best results you should be using 24 bit color and then doing a gaussian blur
after constructing the star

Code: Select all

-layer/new =24 -s/all (498,239 478,176 526,139 465,141 447,83 425,139 366,144 413,178 392,239 443,201) -s/fill -effect/gaussian=1
Scale document if you want a different size. Then lasso and copy to a final document.
_______________________________________________

Scaling and tiling in mtpaint

Posted: Wed 03 Aug 2016, 17:51
by don570
Scaling and tiling in mtpaint

There are two useful commands that should be noted.
The following command will scale the image by 2. Actually height h
is scaled by 2 . The width w is assumed to be scaled by 2 as well.

Code: Select all

-layer/new -image/scale h=x2
To make the object smaller

Code: Select all

-layer/new -image/scale h=x.25
_________________________________________________________

To resize the document i.e. the layer and tile it at the same time
In this example both height and width are expanded with tiles.
There will be 3x3=9 tiles in total.

Code: Select all

-i/resize =tile h=x3
Now for the final example...

The star is created in 24 bit layer and then made smaller and slightly blurred.
It is lassoed and pasted (using alpha blend method to avoid a black outline)
into the centre of a small white document which is then tiled so
that 3x3 stars are the result.

Code: Select all

-layer/new =24 -s/all (498,239 478,176 526,139 465,141 447,83 425,139 366,144 413,178 392,239 443,201) -s/fill -effect/gaussian=1  -image/scale h=x.25  -s/all  -s/"Lasso Selection" -layer/new     w=50 h=50    =24  -e/col a=7  -s/all  -s/"Fill Selection" -e/col  a=1  b=0 -s/'Alpha Blend' -e/"Paste to Centre" -i/resize =tile h=x3
Image
________________________________________________

a selection from GIMP

Posted: Thu 21 Dec 2017, 23:30
by don570
When pasting a selection from GIMP into mtpaint....

The best way is to go to the top menu
Layer > New layer

and from the options choose 'Clipboard'.

This will create a new layer above your old layer.

___________________________________________

Posted: Fri 22 Dec 2017, 00:49
by tallboy
Pity that such a well illustrated thread is almost totally uninteresting to browse without the pics. :(

Seamless pattern for tiling using scripting

Posted: Thu 22 Mar 2018, 22:58
by don570
Seamless pattern for tiling using scripting
Self made - No photo used


An alternate method that uses a photo is here....
http://murga-linux.com/puppy/viewtopic. ... 022#912022

___________________________________________________

Here is a quick method of making your own seamless pattern.
No photo is used.

First step: make a 400x400 pixel image document.
Second step: Paint randomly with brush while gradient is 'ON'
(see image)
Third step(optional): Use smear brush to put a twirl to pattern .

See next post.....

continued from above

Posted: Thu 22 Mar 2018, 23:07
by don570
...continued from above.

Fourth step: Resize to 800x800 pixels (see image)
Image > Resize with tile option 'ON'


Fifth step: A seam will be visible in middle of image. Use your smear brush
to obscure the seam in middle of image.

Sixth step: Run script command to reduce the size of image back to 400x400. The center portion is selected.

image > Script

Code: Select all

-s/all  (200,200 600,600) -image/crop
Press 'Execute' button

The result is a tile-able pattern that is random and seamless. It is 401x401 pixels.

The fact that it is 401x401 pixels rather than 400x400 pixels makes no difference

If you do want 400x400 ---> try

Code: Select all

-s/all  (200,200 599,599) -image/crop

continued from above

Posted: Thu 22 Mar 2018, 23:09
by don570
Gimp and G'mic plug-ins can then add some interesting effects. i.e. 3D and bumping

Here Gimp uses a photo....
https://www.youtube.com/watch?v=TKhs7F0hAik

__________________________________________________

Posted: Sat 24 Mar 2018, 17:45
by don570
Dmitry suggests to solve 401x401 image size problem
a different command....
For a corner&size format, there is the syntax "(200,200,600,600)" or
the explicit "x=200 y=200 w=400 h=400".
This script gives a 400x400 image....

Code: Select all

-s/all  x=200 y=200 w=400 h=400   -image/crop
________________________________________


When using GIMP

1) to convert GIF format to 24 bit color --->

Image > Mode > RGB

2) to make a 3D effect

Filters > Map > Bump Map

3) to rid image of strange repeating paterns

Filters > Map > Make Seamless

See image for final result. It looks like moss growing on copper.
It will look totally random if 'Make Seamless' command is used
_____________________________________