~572, p575, and p57577: three spins/updates of Precise 5.7.1

For talk and support relating specifically to Puppy derivatives
Post Reply
Message
Author
User avatar
Puppus Dogfellow
Posts: 1667
Joined: Tue 08 Jan 2013, 01:39
Location: nyc

updated to p574/p574-L

#16 Post by Puppus Dogfellow »

spacefm file viewer (094), upgrade pack one, user experience tweaks. i think it will be the last that sees separate upgrades and releases for both versions as most of the size difference comes from packages that continually upgrade (wine, libreoffice, java, etc). version2013 already has the 1730 package available--i just downloaded wine 1729 about a week ago, it seems. anyway, that package is available in the wine folder of the repo. install as is if p573, either the sfs or the sfs right-click converted to a pet. (props to don's right-click suite). for those who have p573-L, you'll need to uninstall three packages with the ppm--wine1729doc, wine1729dev, and wine 1729 itself. you can then extract the contents of the sfs and install the three newer, similarly titled pets. or let it be, i guess. next update probably won't be too far off.
mavrothal wrote:
Puppus Dogfellow wrote: i could use some clarification. you mean i open those two files (say, with geany) and find the "precise-5.7.2."es there and change the names to something like p573 (or anything other than "precise-5.7.2") and no one will have any problems? also, if someone's already installed 572, they'll also have no worries as the installation will just let it be?
Is a bit ( :roll: ) more complicated but basically, yes.
DISTRO_FILE_PREFIX is the variable that determines the savefile (and some other things).
If you change DISTRO_PUPPYSFS and DISTRO_ZDRVSFS you have to change your SFSs accordingly.
A final important variable is the DISTRO_IDSTRING that must be added at the end of the puppy sfs and the vmlinuz so init can find them.
'echo -n "$DISTRO_IDSTRING" >> puppy.sfs' will do that (path, name and string must be adjusted for actual).
Make sure you type ">>" and not ">"
The DISTRO_SPECS file should be identical in initrd.gz and the main sfs. So make one as you like and copy it over to the other.
Puppus Dogfellow wrote:
thanks. next version uploaded will have that addressed.
well, not quite. couldn't figure out how to get the code to work. figured out a couple of ways to edit the initrd directly (by extracting it twice, which seemed a bit odd, and through woofy), and it wasn't that hard to get to etc/distrospecs, but i was unclear about what to overwrite with what. there seemed to be a mix of precise571 and 572 references and i didn't want to risk breaking up some sort of internal look up or referral string, so i basically chickened out of messing with it. so it's still in function an upgrade of precise rather than a distinct entity. :? for the smaller of the two isos, i think woofy allowed some sort of suffix before the final ".sfs," but i doubt this will affect much.

***

update of possible interest: new palemoon browser by OscarTalks available in repo.

User avatar
mavrothal
Posts: 3096
Joined: Mon 24 Aug 2009, 18:23

Re: updated to p574/p574-L

#17 Post by mavrothal »

Puppus Dogfellow wrote:well, not quite. couldn't figure out how to get the code to work. figured out a couple of ways to edit the initrd directly (by extracting it twice, which seemed a bit odd, and through woofy), and it wasn't that hard to get to etc/distrospecs, but i was unclear about what to overwrite with what. there seemed to be a mix of precise571 and 572 references and i didn't want to risk breaking up some sort of internal look up or referral string, so i basically chickened out of messing with it. so it's still in function an upgrade of precise rather than a distinct entity. :? for the smaller of the two isos, i think woofy allowed some sort of suffix before the final ".sfs," but i doubt this will affect much.
Bad news first. The "small" iso will not boot because of the name change.
Init is instructed through DISTRO_SPECS to look for "puppy_precise_5.7.2.sfs" but the sfs in the iso is named "puppy_precise_5.7.2p574p.sfs". No good.

Regarding editing the initrd, here is how to do it. Hope is clear.

Regarding DISTRO_SPECS, below is a modified file for "Puppus Dogfellow's Precise Puppy version 1.0" :D (bold the changes)
#One or more words that identify this distribution:
DISTRO_NAME='PD_s Precise Puppy'
#version number of this distribution:
DISTRO_VERSION=1.0
#The distro whose binary packages were used to build this distribution:
DISTRO_BINARY_COMPAT='ubuntu'
#Prefix for some filenames: exs: precisesave.2fs, precise-4.99.0.sfs
DISTRO_FILE_PREFIX='pdprecise'
#The version of the distro whose binary packages were used to build this distro:
DISTRO_COMPAT_VERSION='precise'
#the kernel pet package used:
#retro kernel: linux_kernel-3.2.48-nopae-i486-f2fs-aufs-smp-isa-precise.pet
DISTRO_KERNEL_PET='linux_kernel-3.9.11-pae-i686-precise.pet'
#read by /usr/bin/xwin to bypass Xorg Wizard at first boot:
DISTRO_XORG_AUTO='yes'
DISTRO_TARGETARCH='x86'
#subname for online PETs dir. Ex: 'slacko14', dir 'pet_packages-slacko14', db file 'Packages-puppy-slacko14-official':
#note: prior to existence of this variable, online subname was set to $DISTRO_COMPAT_VERSION or via some hack code.
DISTRO_DB_SUBNAME='precise'
#32-byte alpha-numeric ID-string appended to vmlinuz, puppy_pdprecise_1.sfs, zdrv_pdprecise_1.sfs and devx.sfs:
DISTRO_IDSTRING='p141030194200ZZZZp.d.1XXXXXXXXXX'
#Puppy default filenames...
#Note, the 'SFS' files below are what the 'init' script in initrd.gz searches for,
#for the partition, path and actual files loaded, see PUPSFS and ZDRV in /etc/rc.d/PUPSTATE
DISTRO_PUPPYSFS='puppy_pdprecise_1.0sfs'
DISTRO_ZDRVSFS='zdrv_pdprecise_1.0.sfs'
DISTRO_PUPPYDATE='Nov 2014'
#multiarch distros, such as Ubuntu, will have this. ex: /usr/lib/i386-linux-gnu, so DISTRO_ARCHDIR=i386-linux-gnu
DISTRO_ARCHDIR='i386-linux-gnu'
Feel free to change it :P but the actual sfs names must be the ones you put in DISTRO_SPECS.

Finally regarding the IDSTRING, when you have everything ready, just before you make the iso, assuming that you use the string above, do the following

Code: Select all

echo -n "p141030194200ZZZZp.d.1XXXXXXXXXX" >> /path/to/vmlinuz
echo -n "p141030194200ZZZZp.d.1XXXXXXXXXX" >> /path/to/puppy_sfs
If you change the string make sure that is 32 characters and no spaces.

HTH
== [url=http://www.catb.org/esr/faqs/smart-questions.html]Here is how to solve your[/url] [url=https://www.chiark.greenend.org.uk/~sgtatham/bugs.html]Linux problems fast[/url] ==

User avatar
Puppus Dogfellow
Posts: 1667
Joined: Tue 08 Jan 2013, 01:39
Location: nyc

Re: updated to p574/p574-L

#18 Post by Puppus Dogfellow »

mavrothal wrote:
Puppus Dogfellow wrote:well, not quite. couldn't figure out how to get the code to work. figured out a couple of ways to edit the initrd directly (by extracting it twice, which seemed a bit odd, and through woofy), and it wasn't that hard to get to etc/distrospecs, but i was unclear about what to overwrite with what. there seemed to be a mix of precise571 and 572 references and i didn't want to risk breaking up some sort of internal look up or referral string, so i basically chickened out of messing with it. so it's still in function an upgrade of precise rather than a distinct entity. :? for the smaller of the two isos, i think woofy allowed some sort of suffix before the final ".sfs," but i doubt this will affect much.
Bad news first. The "small" iso will not boot because of the name change.
Init is instructed through DISTRO_SPECS to look for "puppy_precise_5.7.2.sfs" but the sfs in the iso is named "puppy_precise_5.7.2p574p.sfs". No good.

Regarding editing the initrd, here is how to do it. Hope is clear.

Regarding DISTRO_SPECS, below is a modified file for "Puppus Dogfellow's Precise Puppy version 1.0" :D (bold the changes)
#One or more words that identify this distribution:
DISTRO_NAME='PD_s Precise Puppy'
#version number of this distribution:
DISTRO_VERSION=1.0
#The distro whose binary packages were used to build this distribution:
DISTRO_BINARY_COMPAT='ubuntu'
#Prefix for some filenames: exs: precisesave.2fs, precise-4.99.0.sfs
DISTRO_FILE_PREFIX='pdprecise'
#The version of the distro whose binary packages were used to build this distro:
DISTRO_COMPAT_VERSION='precise'
#the kernel pet package used:
#retro kernel: linux_kernel-3.2.48-nopae-i486-f2fs-aufs-smp-isa-precise.pet
DISTRO_KERNEL_PET='linux_kernel-3.9.11-pae-i686-precise.pet'
#read by /usr/bin/xwin to bypass Xorg Wizard at first boot:
DISTRO_XORG_AUTO='yes'
DISTRO_TARGETARCH='x86'
#subname for online PETs dir. Ex: 'slacko14', dir 'pet_packages-slacko14', db file 'Packages-puppy-slacko14-official':
#note: prior to existence of this variable, online subname was set to $DISTRO_COMPAT_VERSION or via some hack code.
DISTRO_DB_SUBNAME='precise'
#32-byte alpha-numeric ID-string appended to vmlinuz, puppy_pdprecise_1.sfs, zdrv_pdprecise_1.sfs and devx.sfs:
DISTRO_IDSTRING='p141030194200ZZZZp.d.1XXXXXXXXXX'
#Puppy default filenames...
#Note, the 'SFS' files below are what the 'init' script in initrd.gz searches for,
#for the partition, path and actual files loaded, see PUPSFS and ZDRV in /etc/rc.d/PUPSTATE
DISTRO_PUPPYSFS='puppy_pdprecise_1.0sfs'
DISTRO_ZDRVSFS='zdrv_pdprecise_1.0.sfs'
DISTRO_PUPPYDATE='Nov 2014'
#multiarch distros, such as Ubuntu, will have this. ex: /usr/lib/i386-linux-gnu, so DISTRO_ARCHDIR=i386-linux-gnu
DISTRO_ARCHDIR='i386-linux-gnu'
Feel free to change it :P but the actual sfs names must be the ones you put in DISTRO_SPECS.

Finally regarding the IDSTRING, when you have everything ready, just before you make the iso, assuming that you use the string above, do the following

Code: Select all

echo -n "p141030194200ZZZZp.d.1XXXXXXXXXX" >> /path/to/vmlinuz
echo -n "p141030194200ZZZZp.d.1XXXXXXXXXX" >> /path/to/puppy_sfs
If you change the string make sure that is 32 characters and no spaces.

HTH
thanks for the clarification, mavrothal. and the heads up regarding the smaller iso. i had misgivings when i filled out that slot--it should have said "you can append something here, but it will screw things up for you" instead of just opening up the possibility. :lol: well, quicker to fix the smaller one. at least in theory.

this one should be okay: p574 (161mb)


and for the sake of convenience:

p574-L (466mb)

thanks again, mavrothal.

User avatar
Puppus Dogfellow
Posts: 1667
Joined: Tue 08 Jan 2013, 01:39
Location: nyc

#19 Post by Puppus Dogfellow »

I was having trouble getting the nvidia driver i added to 574-L to work correctly on a dual screen setup (think i should've included the glx version (OscarTalks) if at all), so I made p5741, which is the same as p574 but with palemoon 25.02 in place of the sea monkey suite, and the addition of the latest wine (1.7.30--thanks to version2013), qt-4.8.2-stripped (i believe thanks to pemasu), jre-1.8u25-i586.pet (thanks to gjuhasz), and dropbox-2.10.28 (thanks to nilsonmorales). 277mb, and basically an upgraded 574-L minus the aforementioned driver, Hydrogen (drum machine, thanks to scabz), LibreOffice (4.3.4 available in repo), Ardour (Digital Audio Workstation, scabz and RSH), and VLC(the 117 by RSH, the 214 and 215 by OscarTalks, and the 205 you can get through 666philb's quickpet all work).


devx_precise_5.7.2.sfs (same as devx_precise_5.7.1.sfs)
Last edited by Puppus Dogfellow on Thu 20 Nov 2014, 22:51, edited 4 times in total.

User avatar
Puppus Dogfellow
Posts: 1667
Joined: Tue 08 Jan 2013, 01:39
Location: nyc

more on root#menus

#20 Post by Puppus Dogfellow »

most of the root menus i included are pretty sparse, but the following entered into any of them will (after a jwm restart) add two slots, one for the nine panel sets and one for the six pinboards:
<Menu label="panels" icon="" height="16">
<Program label="p1">p1</Program>
<Program label="p2">p2</Program>
<Program label="p3">p3</Program>
<Program label="p4">p4</Program>
<Program label="p5">p5</Program>
<Program label="p6">p6</Program>
<Program label="p7">p7</Program>
<Program label="p8">p8</Program>
<Program label="p9">p9</Program>
</Menu>
<Menu label="pinboards" icon="" height="16">
<Program label="pp1">pp1</Program>
<Program label="pp2">pp2</Program>
<Program label="pp3">pp3</Program>
<Program label="pp4">pp4</Program>
<Program label="pp5">pp5</Program>
<Program label="pp6">pp6</Program>
</Menu>
not every pup in this series of releases has a PuppyPin6 (one or two oversights), but they all have a PuppyPin-Old, courtesy of big_bass's mnt_all_three script. this is a back up the original desktop but minus the drive icons. if you add a file composed of

Code: Select all

#!/bin/sh

rox --pinboard=/root/Choices/ROX-Filer/PuppyPin-Old


to /root/my-applications/bin and name it "ppo," you can add it to the menus using the above templates, which could also be used to add any other program or script to any of the root menus, including the main one (/_root_.jwmrc) in /etc/xdg/templates.

ex:

<Program label="ppo" icon="[path of image of your choice]" >ppo</Program>

if your menus start to grow too large (copying entries from /root/.jwmrc is perhaps a too easy way to populate the menu), the

Code: Select all

<Menu label="batch 1" icon="" height="16">
[entries]
</Menu>
template is a good way to compress them down to one line/pipe menu slot on any of them.

User avatar
Puppus Dogfellow
Posts: 1667
Joined: Tue 08 Jan 2013, 01:39
Location: nyc

p574, p575, and p57577

#21 Post by Puppus Dogfellow »

or maybe just yellow, chocolate, and black labs. no wallpaper pic because each has snuck away to shred some garbage somewhere....

folder containing the isos: p574, p575, p57577, which also includes gz-compressed versions of each iso's main sfs file.

info contained in folder:
murga thread for these isos

murga thread that served as developmental thread for the p series of isos
(details wmp4 package, etc.)

repo thread

***

precise 5.7.1 patched to 5.7.2 (sfsload updated to 2.3, bash updated to 4.1.17(1), save folder functionality added) plus


AFI-1.0.2.pet pexec-001.pet
antiword_0.37-8.pet PupMates_01-Apr-2014.pet
wmp4.tar.gz (give or take) Pup-Shots.pet
brother_mfc685cw-1.0.pet qt4-4.3.2.pet
copy-fast-2.3.pet quickpet-1.7.pet
darkgray-0.pet recoll-1.13.02.pet
dash-0.5.6.pet Right-click-6.8.1.pet
empty-files-1.1.pet roxiconchanger-0.3.2.pet
ExifTool-8.66.pet roxmenu_new.win.pet
f2fs-installer-0.1.2.pet sakura-2.3.8.pet
flashplayer11-11.2.202.400.pet sfs2pet-20121001.pet
geany-1.24.1-1-i686.pet swapfilemanager-4.6.pet
get_libreoffice-0.30.pet tas-1.8.pet
gexec-0.4-pup1.pet ted-2.23-i386.deb
GTK_Theme_Maker-1.7.1.pet Tema_Aurora-1.pet
jreclicker.pet unrpm.pet
jwmthememaker-1.7.4.pet unrtf_0.19.3-1.1.pet
libQt3Support.so.4.pet vte-0.22.5.pet
libxapian22_1.2.8-1.pet wmctrl-1.07-6_i386.pet
LP2_TerminatorX382.pet woofy-0.91.pet
lxtask-0.1.3.pet xapian-core-1.0.18.pet
moblin_stark-1.1.pet xbindkeys-1.8.3.pet
mswebfonts_525.pet xdotool-2.20110530.1-3.pet
PackIt-1.5.pet xpad-4.0.pet
PaDS-1.0.4.pet xvkbd-3.1.pet
parcellite_1.1.9-1_i386.deb xwit-3.4.pet
partview-2014.pet yad-0.12.4-i486.pet
peasypdf-2.9.pet zarfy-0.1.0-i486.pet
Pet_Maker-2.3.pet zensound-0.2b.pet
speeddials winswitcher
mount_all3 roxrefresh
drivespacehoverscriptfromSFR
pic2txt-1.2.pet
peasyglue-1.8.pet
peasyprint-2.7.pet tesseract-3.00-i486.pet
peasyscale-1.6b.pet tesseract_eng-3.00.pet
peasyscan-2.7.pet
peasyscan_pdf_plugin-1.1.pet
advanced bash guide v10.0
peek-a-pet-1.2
pfind 5.14
debbi.pet
spacefm 0.9.4

is p574.


p574 plus

goldendict-1.0.2-precise.pet seq24_0.9.2.pet
goldendict-wordnet_3.0-26.1_all.deb vlc-2.1.4-wheezy.pet
gtk_youtube_viewer-3.0.2_precise.pet wine-1.7.30-i486_v2.1.pet
guvcview-1.5.3.pet wine_DEV-1.7.30-i486_v2.pet
jre-1.8u25-i586.pet wine_DOC-1.7.30-i486.pet
mydbox-1.0_noarch.pet wine_extras-v2.pet
palemoon-25.0.2-i686.pet wine_menu-1.pet
pmusic-4.4.6.pet winenv-1.0.pet
qt-4.8.5-i686-stripped_5.6.1.pet

is p575.

p575 plus


Ardour3-3.5.357-i686-Precise_5.7.1nodep.pet LP2_XorgHigh.pet
gimp-painter-2.8.pet rakarrack-0.6.1-i686.pet
hydrogen-0.9.5.1-s-i686-precise.pet rakarrack_DOC-0.6.1-i686.pet
LibreOffice-4.3.4_en-US_xz.pet rassam-paint-1.0.pet
LP2_sooperlooper_1.6.14dfsg-1.pet rosegarden-13.10-i686.pet

is p57577

___________________________

all the isos start out with the default applications from precise 5.7.1 minus abiword, osmo, planner, rubix, and emeraldia. p575 and p57577 further removes homebanking and the sea monkey suite (though i wouldn't be surprised if it hung around--saw at least one residual file on one of the isos, though that could've been created by the pale moon installation, since that's also a mozilla product…).


for further consideration:


when the isos are made, i go back and recompress the main sfs as xz, which saves about 20 percent off overall size but gives a time penalty of similar magnitude. i've uploaded gz-compressed sfses for the three isos--if you're not using a live cd or dvd and don't need the ~ 50-200 mb savings, it may be worth it to swap out the xz compressed sfs for the gz compressed one (you can also do it yourself through uextract and parchive available in rox's right click menu) for the quicker load time (once the programs are running, there's no performance difference). they're in separate folders named for their respective isos and include the gz zdrv file--just decompress the folder and swap (you can also convert your installation to either of the two other varieties this way).


enjoy


--p.dogfellow, 11/23/14

(hopefully a more concise version of the distro details already discussed and hopefully a reminder to myself to test load times at various compression levels and sizes).

well, that may never happen, so here's the results for the bash vulnerability test:

CVE-2014-6271 (original shellshock): not vulnerable
CVE-2014-6277 (segfault): not vulnerable
CVE-2014-6278 (Florian's patch): not vulnerable
CVE-2014-7169 (taviso bug): not vulnerable
CVE-2014-7186 (redir_stack bug): not vulnerable
CVE-2014-7187 (nested loops off by one): not vulnerable
CVE-2014-//// (exploit 3 on http://shellshocker.net/): not vulnerable

(results as of 12/15/14)

edit: deleted the outdated, alternately compressed SFSes as rufwoof's investigations address the issues i raised and more.
Last edited by Puppus Dogfellow on Wed 21 Jan 2015, 04:19, edited 2 times in total.

User avatar
Puppus Dogfellow
Posts: 1667
Joined: Tue 08 Jan 2013, 01:39
Location: nyc

i find this supplemental menu slot useful

#22 Post by Puppus Dogfellow »

Code: Select all

<Menu label="sup2" icon="" height="16">
<Program label="notecase" icon="">notecase</Program>
<Program label="htop" icon="">htOPuRXVT</Program>
<Program label="hlx" icon="">hlx</Program>
<Program label="lxtask" icon="">lxtask</Program>
<Program label="partview" icon="">partview</Program>
<Program label="galc" icon="">galculator</Program>
<Program label="ffdrive" icon="">firefox https://docs.google.com/document/u/0/</Program>
<Program label="pfind" icon="">pfind</Program>
<Program label="pmdrive" icon="">palemoon https://docs.google.com/document/u/0/</Program>
<Program label="geany" icon="">geany</Program>
<Program label="xpad" icon="">xpad</Program>
<Program label="leafpad" icon="">leafpad</Program>
 <Program label="gFnRenam" icon="">gfnrename</Program>
<Program label="gfontsel" icon="">gfontsel</Program>
<Program label="gcolor" icon="">gcolor2</Program>
<Program label="goldendict" icon="">goldendict</Program>
<Program label="recoll" icon="">recoll</Program>
<Program label="vlc" icon="">vlc</Program>
<Program label="hydrogen" icon="">hydrogen</Program>
<Program label="ted" icon="">Ted</Program>
<Program label="winswitcher" icon="">winswitcher</Program>
<Program label="speeddials" icon="">sd</Program>
<Program label="close all rox" icon="">cr</Program>
</Menu>

contains two examples (one for firefox and one for palemoon) of how to get a browser entry on a menu to open a specific site (add more sites separated by a space if you want it to open multiple tabs when launched), but i'm really including it here for convenience. it's a bunch of stuff i find myself reaching for fairly frequently, so i put it on the left click menu, and then just about all the menus, since it's only one line and why have to remember which if it's basically everywhere. changes in the menu require a jwm restart to show. changes in the root 3 menu (the little dog/right click/main menu) require fixmenus entered into a terminal and a jwm restart.

the following are not all included in these releases, but have started to look something like a supplemental network/places menu (i'm pretty clueless about networks and so have just mainly used cloud synching to move stuff between my machines. anyway, i'm starting to become interested in it...), and could also conceivably be of use to someone.

Code: Select all

<Menu label="sorta networking, sorta scratching" icon="" height="16">
<Program label="pcp" icon="">pcp</Program>
<Program label="mixxx" icon="">mixxx</Program>
<Program label="spideroak" icon="">SpiderOak</Program>
<Program label="dropbox" icon="">dropbox</Program>
<Program label="copyagent" icon="">copyagent</Program>
<Program label="filezilla" icon="">filezilla</Program>
</Menu>
i just added the following to an earlier post about window manipulation shortcuts. if you plug in the left hand column from below into the >program< slots, you can use them without needing to make shortcut keys for them. even quicker would be to highlight the lot (located in /root/my-applications/bin) and drag them to a panel. will eventually upload a set of icons for them, but in the meantime, if you use the panel method, you won't be able to read the script name unless you right click > panel options > image and text. for the entries, copy the above and replace ten slots two times (label and program can be the same--i tried to set it up in a way that was fairly easy to remember...)

a1 -- upper left quadrant of left screen
a2 -- upper right quadrant of left screen
a3 -- lower left quadrant of left screen
a4 -- lower right quadrant of left screen
a5 -- quadrant-sized window placed at center of left screen
a6 -- upper left quadrant of right screen
a7 -- upper right quadrant of right screen
a8 -- lower left quadrant of right screen
a9 -- lower right quadrant of right screen
a10 -- quadrant-sized window placed at center of right screen
b1 -- left half of left screen
b2 -- right half of left screen
b3 -- top half of left screen
b4 -- bottom half of left screen
b5 -- full screen left
b6 -- left half of right screen
b7 -- right half of right screen
b8 -- top half of right screen
b9 -- bottom half of right screen
b10 -- full screen right


well, on second thought, here. mostly already done for you. you can get more specific with the titles but,

Code: Select all

<Menu label="dual screens size and placement" icon="" height="16">
<Menu label="quarters and quadrants" icon="" height="16">
<Program label="a1" icon="">a1</Program>
<Program label="a2" icon="">a2</Program>
<Program label="a3" icon="">a3</Program>
<Program label="a4" icon="">a4</Program>
<Program label="a5" icon="">a5</Program>
<Program label="a6" icon="">a6</Program>
<Program label="a7" icon="">a7</Program>
<Program label="a8" icon="">a8</Program>
<Program label="a9" icon="">a9</Program>
<Program label="a10" icon="">a10</Program>
</Menu>
<Menu label="halves and wholes" icon="" height="16">
<Program label="b1" icon="">b1</Program>
<Program label="b2" icon="">b2</Program>
<Program label="b3" icon="">b3</Program>
<Program label="b4" icon="">b4</Program>
<Program label="b5" icon="">b5</Program>
<Program label="b6" icon="">b6</Program>
<Program label="b7" icon="">b7</Program>
<Program label="b8" icon="">b8</Program>
<Program label="b9" icon="">b9</Program>
<Program label="b10" icon="">b10</Program>
</Menu>
</Menu>
entered into a menu (or ten) will place the functions in a menu slot further divided into the quadrant (a) series and the larger (b) series. more info, including how to tailor it for your specific size/placement needs, here (same link as placed in the more buried post i mentioned earlier.)


...to get that htOPuRXVT (htop thru urxvt) script to work, you may have to copy it from quar in the startup folder to /root/my-applications/bin...


_____________

here's palemoon opening a few useful sites and to pages that will allow you to install some useful addons:

Code: Select all

palemoon http://www.murga-linux.com/puppy/index.php http://www.givemebackmygoogle.com/ https://www.ixquick.com/ http://www.murga-linux.com/puppy/index.php?f=63 http://www.timeanddate.com/worldclock/ https://addons.mozilla.org/en-us/firefox/addon/adblock-plus/ https://addons.mozilla.org/en-US/firefox/search/?q=flashbock&appver=31.0&platform=linux https://addons.mozilla.org/en-US/firefox/addon/copy-as-plain-text/?src=hp-dl-promo 
you can substitute "firefox" for "palemoon"--these add-ons will work. add #!/bin/sh atop a a text file and make it a startup script, substituting your preferences...

flashblock and adblock work really well--once you get used to having them you'll likely never want to run a browser without them. the two links to here are nice, the two search engines possibly redundant. if you make it a script, you don't need to add all that code to the root#menu to give it an entry--just the name of the script once linked or copied to /root/my-applications/bin. this has the further advantage of instant response--changes to the script don't need jwm restarts to take effect. you can set most programs to open multiple files in this way.

ex:

Code: Select all

rox /root /etc /root/my-applications/bin
will open three rox folders; geany and leafpad work this way, but for libreoffice, you will have to specify which part of the suite you want:

Code: Select all

 #!/bin/sh

libreoffice4.3 --writer /root/docatstartup.odt /root/docatstartup2.odt /root/docatstartup3coskb.odt

#(script, call it lo1 to get the terminal in on it, or drag to startup) 
or

Code: Select all

 <Program label="libreofficedoc2" icon="">libreoffice4.3 --writer /root/docatstartup2.odt /root/docatstartup.odt /root/docatstartup3coskb.odt</Program> 

<!--    ^  for a menu entry    --> 
or, for a keyboard shortcut:

Code: Select all

 <Key mask="SAC" key="(for example,)Escape">exec:libreoffice4.3 --writer /root/docatstartup2.odt /root/docatstartup.odt /root/docatstartup3coskb.odt</Key>  
or

Code: Select all

 <Key mask="SAC" key="(for example,)Escape">exec:lo1</Key>  
(if you've made a script and added it to the path (for example, /root/my-applications/bin). changes made here get instantly reflected in the key as they do in the menu--no need to run fixmenus or restart jwm once the entry is already registered (i.e. change the script and the function will change, but if you want the menu item to reflect a possibly new function, you'll have to restart jwm after the edit. since it's up to you to remember what you assigned to which key, ...). the code for the keyboard shortcuts goes in /root/.jwm/jwmrc-personal. the menu entries can go to any of the root#menus in /root or in _root_.jwmrc in /etc/xdg/templates.)

edit: here's the dual screen windows placement/sizing menu with better labeling:

Code: Select all

	<Menu label="for double monitors" icon="" height="16">
			<Menu label="quadrants and quarters" icon="" height="16">
<Program label="upper left quadrant of left screen" icon="">a1</Program>
<Program label="upper right quadrant of left screen " icon="">a2</Program>
<Program label="lower left quadrant of left screen " icon="">a3</Program>
<Program label="lower right quadrant of left screen " icon="">a4</Program>
<Program label="quadrant-sized window placed at center of left screen " icon="">a5</Program>
<Program label="upper left quadrant of right screen" icon="">a6</Program>
<Program label="upper right quadrant of right screen" icon="">a7</Program>
<Program label="lower left quadrant of right screen " icon="">a8</Program>
<Program label="lower right quadrant of right screen" icon="">a9</Program>
<Program label="quadrant-sized window placed at center of right screen " icon="">a10</Program>
</Menu>
<Include>/root/places_submenu</Include>
<Desktops></Desktops>
<Menu label="halves and wholes" icon="" height="16">
<Program label="left half of left screen" icon="">b1</Program>
<Program label="right half of left screen" icon="">b2</Program>
<Program label="top half of left screen" icon="">b3</Program>
<Program label="bottom half of left screen" icon="">b4</Program>
<Program label="full screen left " icon="">b5</Program>
<Program label="left half of right screen " icon="">b6</Program>
<Program label="right half of right screen" icon="">b7</Program>
<Program label="top half of right screen " icon="">b8</Program>
<Program label="bottom half of right screen" icon="">b9</Program>
<Program label="full screen right  " icon="">b10</Program>
</Menu>
<Program label="winswitcher" icon="">winswitcher</Program>
<Program label="speeddials" icon="">sd</Program>
<Program label="close all rox" icon="">cr</Program>
</Menu>
Last edited by Puppus Dogfellow on Thu 11 Dec 2014, 19:03, edited 2 times in total.

User avatar
Puppus Dogfellow
Posts: 1667
Joined: Tue 08 Jan 2013, 01:39
Location: nyc

improved desktop layout

#23 Post by Puppus Dogfellow »

Image

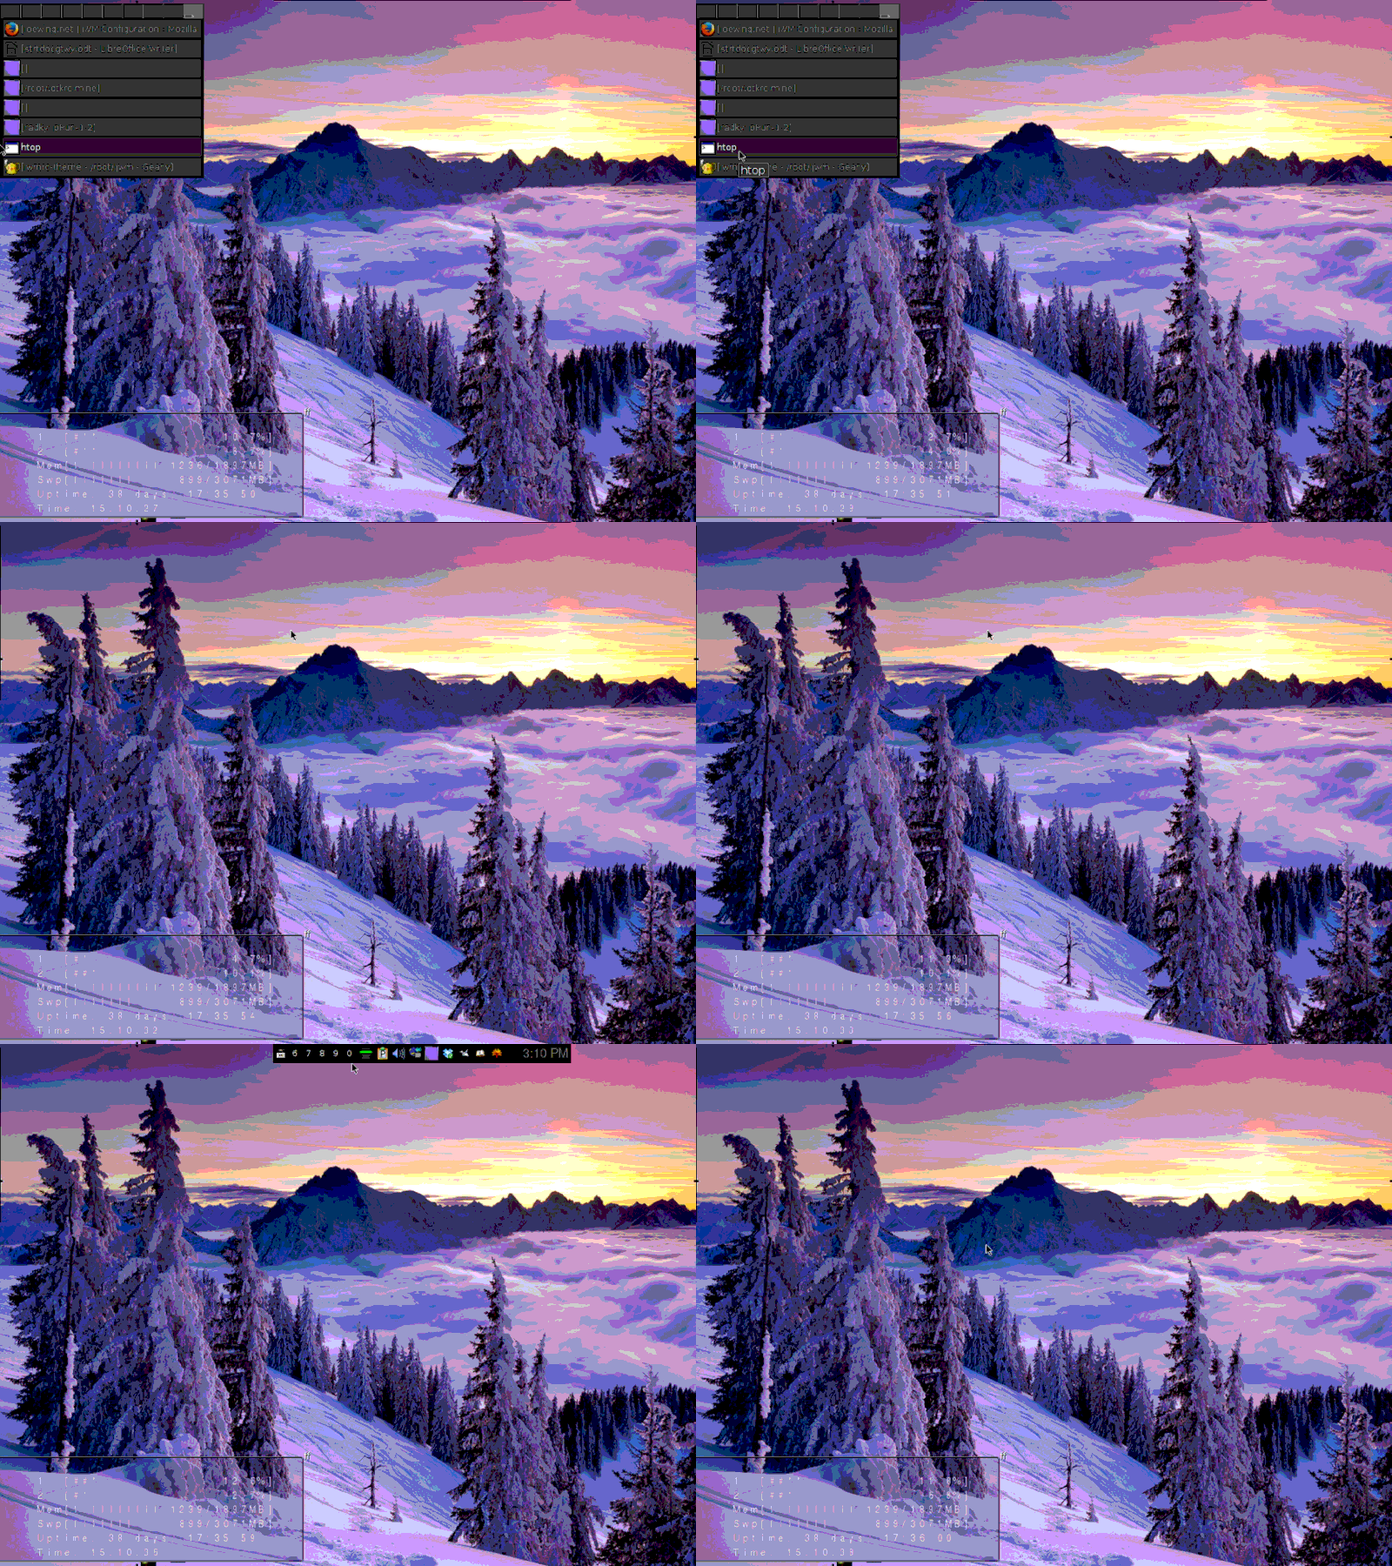
changed the interface to two taskbars, one on the left (pager and tasklist) and top middle (show desktop, menus 6,7,8,9, and 0 (since the other five are already on the mouse, which brings up an interesting trick: if you move the stock tray over a pixel and drop the root menu button, you can use that little space (throw the mouse into the lower left corner) to access all five mouse menus…), dock, and clock. they are set to autohide and i left the pixel border around maximized windows (to easily access mouse menus and desktop shortcuts beneath otherwise maximized windows)…transparent, titleless htop covers the drive icons (which have been reduced to lines--horizontal for unmounted, vertical for mounted, vertical and hollowed out for boot drive), so the desktop is a little safer from people who may not know how to get in to cause havoc (you need to grab a thin border or go to the (autohidden) taskbar to uncover them), though the main reason for the minimalism is so the desktop would basically just be an image of your choosing without much to interfere with it. you can put the clock on htop (since autohide takes away the one on the taskbar unless you mouse over it.)

the gif shows the five mouse menus (well the version that didn't include the shot beneath the htop window did :roll: ) and the two extant trays. the image is from a google search of winter and isn't posterized/impressionismized in its original form--the poor quality monitor i'm using plus the reduction setting i used in making the gif are the reason it looks as it does.

to get the titleless htop window, add

Code: Select all

 <Group>
     <Class>urxvt</Class>
        <Name>urxvt</Name>
        <Option>notitle</Option>
		<Option>sticky</Option>
    </Group>
to jwmrc-personal. i like the grey theme but dislike how thick the borders are. to change this, go to /root/.jwm/jwmrc-theme and change the width setting in window style. to stop the stock lower tray from showing, you'll need to comment out a line in /etc/xdg/templates/_root_.jwmrc, making it

Code: Select all

	<!-- <Include>/root/.jwmrc-tray</Include>-->
comment out the two upper trays (add the <!-- --> bit) in jwmrc-personal and add (<Include>path-to-file</Include>) a tray file consisting of

Code: Select all


<JWM>
   <Tray  autohide="true" insert="right" valign="top" x="280" y="-1" border="1" height="28" >
   <TrayButton popup="Show Desktop" icon="mini-desktop.xpm">showdesktop</TrayButton>
<TrayButton label="6">root:6</TrayButton>

<TrayButton label="7">root:7</TrayButton>
<TrayButton label="8">root:8</TrayButton>
<TrayButton label="9">root:9</TrayButton>
<TrayButton label="0">root:0</TrayButton>

 <Dock/>

<Clock format="%l:%M %p">PupClockset</Clock> 
   </Tray>
</JWM>


in their place.

to get the bottom pixel border, you'll need to add

Code: Select all


   <Tray x="200" y="-1">
      <Spacer width="1" height="1"/>
   </Tray>
to jwmrc-personal and comment out the one

(

Code: Select all

<!--<Tray x="200" y="-27">-->
 <!--      <Spacer width="1" height="1"/>-->
 <!--   </Tray> -->
#d
)

that sets it above the now removed lower tray. to get the pager to show ten across rather than two rows of five, change the values of

Code: Select all

<!-- Number of virtual desktops -->
<Desktops width="5" height="2"/>
to 10 and 1.

User avatar
Puppus Dogfellow
Posts: 1667
Joined: Tue 08 Jan 2013, 01:39
Location: nyc

#24 Post by Puppus Dogfellow »

...will eventually upload a set of icons for them...

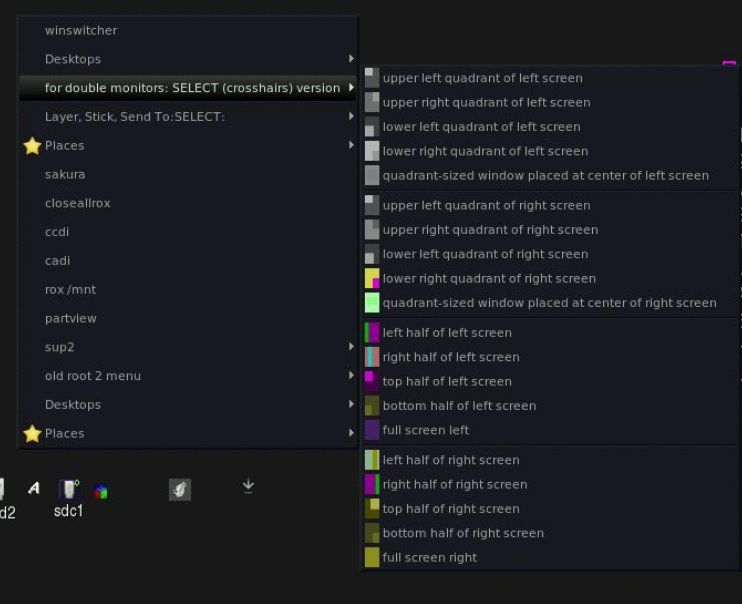
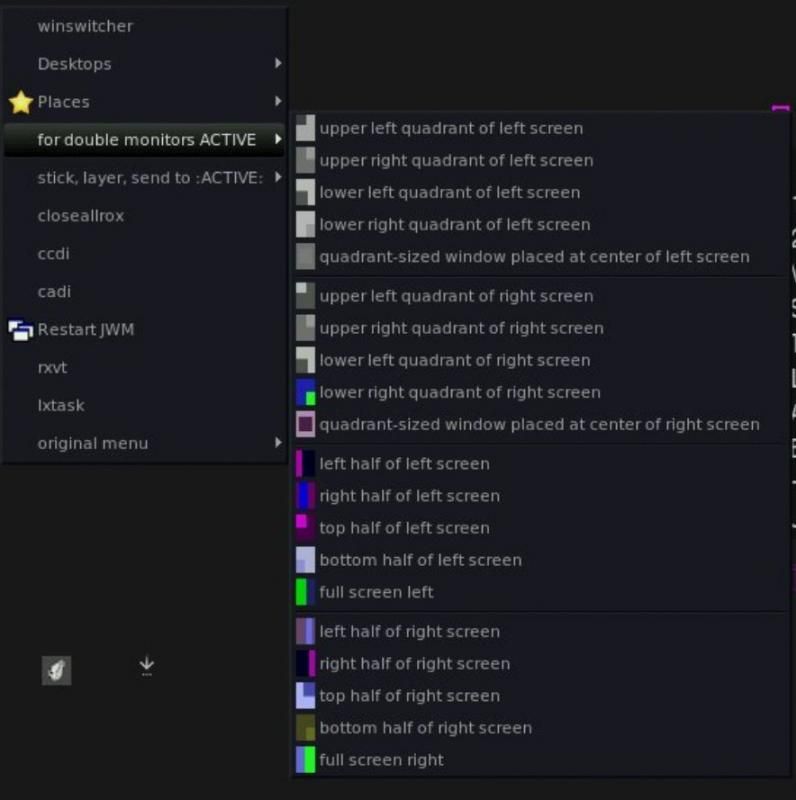
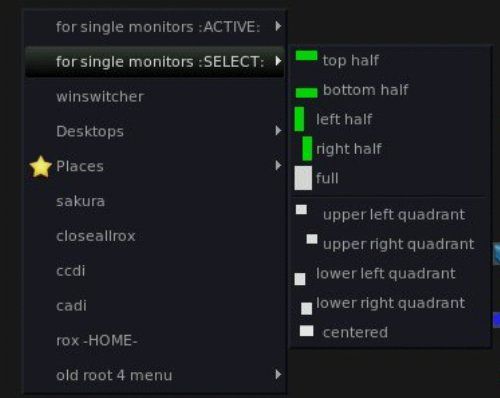
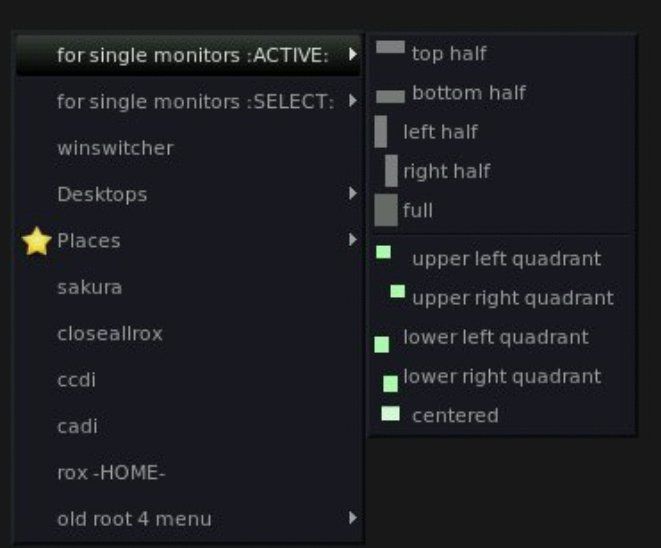
some shots of the placement menus (placed in menus which may differ from yours):

Image

Image

Image


Image


PlacementPack2

it contains icons (copy or symlink them into /root/puppy-reference/mini-icons) and two versions of the menu. personally i prefer the one in the PlacementPack2.readme. you get ten placements/sizings for single monitor setups and a twenty for duals, each of which is doubled to account for a choice of instant (menu item (or shortcut key) works on active window) or click (you get a cross hair which will act on the next window you click) activation. the scripts are largely already in /root/my-applications/bin, but one or two may be newer or new. you can just copy the lot and overwrite any conflicts. or decline to. it shouldn't matter much.

here's the pastable menu bit:

Code: Select all

	 <Program label="closeallrox">closeallrox</Program>
	 <Program label="cr">cr</Program>
  <Program label="sakura">sakura</Program>
	<Program label="winswitcher" icon="">winswitcher</Program>
	
<Desktops></Desktops>    
 
  
<Menu label="windows management: ACTIVE" icon="" height="16">
<Menu label="for double monitors" icon="" height="16">

<Program label="upper left quadrant of left screen" icon="a1.png">a1</Program>
<Program label="upper right quadrant of left screen " icon="a2.png">a2</Program>
<Program label="lower left quadrant of left screen " icon="a3.png">a3</Program>
<Program label="lower right quadrant of left screen " icon="a4.png">a4</Program>
<Program label="quadrant-sized window placed at center of left screen " icon="a5.png">a5</Program>
 <Separator/> 
<Program label="upper left quadrant of right screen" icon="a6.png">a6</Program>
<Program label="upper right quadrant of right screen" icon="a7.png">a7</Program>
<Program label="lower left quadrant of right screen " icon="a8.png">a8</Program>
<Program label="lower right quadrant of right screen" icon="a9.png">a9</Program>
<Program label="quadrant-sized window placed at center of right screen " icon="a10.png">a10</Program>
 <Separator/> 
<Program label="left half of left screen" icon="b1.png">b1</Program>
<Program label="right half of left screen" icon="b2.png">b2</Program>
<Program label="top half of left screen" icon="b3.png">b3</Program>
<Program label="bottom half of left screen" icon="b4.png">b4</Program>
<Program label="full screen left " icon="b5.png">b5</Program>
 <Separator/> 
<Program label="left half of right screen" icon="b6.png">b6</Program>
<Program label="right half of right screen" icon="b7.png">b7</Program>
<Program label="top half of right screen " icon="b8.png">b8</Program>
<Program label="bottom half of right screen" icon="b9.png">b9</Program>
<Program label="full screen right  " icon="b10.png">b10</Program>

</Menu>

<Menu label="for single monitors :ACTIVE:" icon="" height="16">
 <Program label="top half" icon="tha.png">tophalf2</Program>
  <Program label="bottom half" icon="bha.png">bottomhalf2</Program>
   <Program label="left half" icon="lha.png">lefthalf2</Program>
   <Program label="right half" icon="rha.png">righthalf2</Program>
   <Program label="full" icon="fulla.png">fulla</Program>
 <Separator/> 
   <Program label="upper left quadrant" icon="ul.png">upperleftquadrant2</Program>
  <Program label="upper right quadrant" icon="ur.png">upperrightquadrant2</Program>
  <Program label="lower left quadrant" icon="ll.png">lowerleftquadrant2</Program>
   <Program label="lower right quadrant" icon="lr.png">lowerrightquadrant2</Program>
    <Program label="centered" icon="c.png">lp5a</Program>
 </Menu>

 <Menu label="Send To" icon="" height="16">
   <Program label="1">wmctrl -r :ACTIVE: -t0</Program>
   <Program label="2">wmctrl -r :ACTIVE: -t1</Program>
      <Program label="3">wmctrl -r :ACTIVE: -t2</Program>
   <Program label="4">wmctrl -r :ACTIVE: -t3</Program>
      <Program label="5">wmctrl -r :ACTIVE: -t4</Program>
   <Program label="6">wmctrl -r :ACTIVE: -t5</Program>
      <Program label="7">wmctrl -r :ACTIVE: -t6</Program>
   <Program label="8">wmctrl -r :ACTIVE: -t7</Program>
      <Program label="9">wmctrl -r :ACTIVE: -t8</Program>
   <Program label="10">wmctrl -r :ACTIVE: -t9</Program>
    <Program label="Stick/Unstick">wmctrl -r :ACTIVE: -b toggle,sticky</Program>
 </Menu>   

 <Program label="Stick">wmctrl -r :ACTIVE: -b add,sticky</Program>
 <Program label="Unstick">wmctrl -r :ACTIVE: -b remove,sticky</Program>
 
 <Menu label="Layer">
   <Program label="below">wmctrl -r :ACTIVE: -b add,below</Program>
   <Program label="normal">wmctrl -r :ACTIVE: -b remove,above,below</Program>
   <Program label="above">wmctrl -r :ACTIVE: -b add,above</Program>
 </Menu>
</Menu>

  <Include>/root/places_submenu</Include>   
  <Program label="cadi">cadi</Program>
  <Program label="ccdi">ccdi</Program>
<Program label="speeddials" icon="">sd</Program>


<Menu label="windows management: SELECT" icon="" height="16">


<Menu label="for single monitors :SELECT:" icon="" height="16">
 <Program label="top half" icon="th.png">tophalf</Program>
  <Program label="bottom half" icon="bh.png">bottomhalf</Program>
   <Program label="left half" icon="lh.png">lefthalf</Program>
   <Program label="right half" icon="rh.png">righthalf</Program>
  <Program label="full" icon="fulls.png">fulls</Program>
   <Separator/> 
    <Program label="upper left quadrant" icon="uls.png">upperleftquadrant</Program>
  <Program label="upper right quadrant" icon="urs.png">upperrightquadrant</Program>
  <Program label="lower left quadrant" icon="lls.png">lowerleftquadrant</Program>
   <Program label="lower right quadrant" icon="lrs.png">lowerrightquadrant</Program>
<Program label="centered" icon="cs.png">lp5</Program>
</Menu>

<Menu label="for double monitors: SELECT (crosshairs) version" icon="" height="16">

<Program label="upper left quadrant of left screen" icon="as1.png">as1</Program>
<Program label="upper right quadrant of left screen " icon="as2.png">as2</Program>
<Program label="lower left quadrant of left screen " icon="as3.png">as3</Program>
<Program label="lower right quadrant of left screen " icon="as4.png">as4</Program>
<Program label="quadrant-sized window placed at center of left screen " icon="as5.png">as5</Program>
   <Separator/> 
<Program label="upper left quadrant of right screen" icon="as6.png">as6</Program>
<Program label="upper right quadrant of right screen" icon="as7.png">as7</Program>
<Program label="lower left quadrant of right screen " icon="as8.png">as8</Program>
<Program label="lower right quadrant of right screen" icon="as9.png">as9</Program>
<Program label="quadrant-sized window placed at center of right screen " icon="as10.png">as10</Program>
   <Separator/> 

<Program label="left half of left screen" icon="bs1.png">bs1</Program>
<Program label="right half of left screen" icon="bs2.png">bs2</Program>
<Program label="top half of left screen" icon="bs3.png">bs3</Program>
<Program label="bottom half of left screen" icon="bs4.png">bs4</Program>
<Program label="full screen left " icon="bs5.png">bs5</Program>
   <Separator/> 
<Program label="left half of right screen " icon="bs6.png">bs6</Program>
<Program label="right half of right screen" icon="bs7.png">bs7</Program>
<Program label="top half of right screen " icon="bs8.png">bs8</Program>
<Program label="bottom half of right screen" icon="bs9.png">bs9</Program>
<Program label="full screen right  " icon="bs10.png">bs10</Program>
</Menu>

 <Menu label="Send To" icon="" height="16">
   <Program label="1">wmctrl -r :SELECT: -t0</Program>
   <Program label="2">wmctrl -r :SELECT: -t1</Program>
      <Program label="3">wmctrl -r :SELECT: -t2</Program>
   <Program label="4">wmctrl -r :SELECT: -t3</Program>
      <Program label="5">wmctrl -r :SELECT: -t4</Program>
   <Program label="6">wmctrl -r :SELECT: -t5</Program>
      <Program label="7">wmctrl -r :SELECT: -t6</Program>
   <Program label="8">wmctrl -r :SELECT: -t7</Program>
      <Program label="9">wmctrl -r :SELECT: -t8</Program>
   <Program label="10">wmctrl -r :SELECT: -t9</Program>
    <Program label="Stick/Unstick">wmctrl -r :SELECT: -b toggle,sticky</Program>
 </Menu>   

 <Program label="Stick">wmctrl -r :SELECT: -b add,sticky</Program>
 <Program label="Unstick">wmctrl -r :SELECT: -b remove,sticky</Program>
 
 <Menu label="Layer">
   <Program label="below">wmctrl -r :SELECT: -b add,below</Program>
   <Program label="normal">wmctrl -r :SELECT: -b remove,above,below</Program>
   <Program label="above">wmctrl -r :SELECT: -b add,above</Program>
 </Menu>


</Menu>
it also allows you to do layers, send-tos, and stickies with your choice of either instant (active window) or click (cross hair) activation.


i find this bit is helpful (use it to squash down your menus when they get too big--just sandwich the existing code below the

Code: Select all

 <?xml version="1.0"?>
<JWM>
<RootMenu onroot="#">
and above the

Code: Select all

</RootMenu></JWM>
between one of the following:

Code: Select all

<Menu label="old root 1 menu" icon="" height="16">
</Menu>

<Menu label="old root 2 menu" icon="" height="16">
</Menu>

<Menu label="old root 3 menu" icon="" height="16">
</Menu>

<Menu label="old root 4 menu" icon="" height="16">
</Menu>


<Menu label="old root 5 menu" icon="" height="16">
</Menu>

<Menu label="old root 6 menu" icon="" height="16">
</Menu>

<Menu label="old root 7 menu" icon="" height="16">
</Menu>

<Menu label="old root 8 menu" icon="" height="16">
</Menu>

<Menu label="old root 9 menu" icon="" height="16">
</Menu>

<Menu label="old root 0 menu" icon="" height="16">
</Menu>
Last edited by Puppus Dogfellow on Fri 06 Mar 2015, 15:39, edited 2 times in total.

User avatar
Puppus Dogfellow
Posts: 1667
Joined: Tue 08 Jan 2013, 01:39
Location: nyc

~572, an update of p574, 12/28/14

#25 Post by Puppus Dogfellow »

p574 with home banking and the sea monkey suite removed and
dbus-1.8.12_i686.pet
GTK_Theme_Maker-1.9.3.pet
jwmthememaker-1.9.6.pet
deb2pet.rpm2pet-0.0.4.pet
evilvte_0.5.0-1.pet
pGtk-theme-refresh-1.1.pet
gnewpet-6.5.pet
Right-click-6.9.0.pet
pminstaller.sh
added is ~572. Whitesnow's upgraded dbus has been added to allow for easy installation of her mydropbox_1.2.pet. the installer for pale moon has been added to the first folder in root (i think i named it "0_check here to install pale moon browser_0") so you can have something up to date, lightweight, and fast. the interface has been changed to one similar to this, but with 24 desktops (three rows of eight) instead of one row of ten. i like the idea of keeping the OS elements out of your way, and noticed how much more real estate you get for the task list this way, so i figured why not pile on the desktops, since the pager in its new position is pretty unobtrusive. turns out anything over 24 is a problem for the <desktops/> tag and send to menu on a little netbook screen so that's the upper limit as far as built in navigation (d1-d24 in a terminal send you) terminal/menu tweaks. change the line in jwmrc-personal to get desktop arrangements beyond the 5 by 2 offered by the gui.

the trays autohide and there's no longer a bottom tray, but you can get it back by uncommenting (remove the <!-- and -->) out the <!--<Include>/root/jwmrc-tray</Include>--> line in jwmrc-personal. it's set to be just a task list moved over to the right a pixel (so you have five mouse menus accessible on the far left instead of just root:3/the right click one), but you can get the original back by renaming the 0jwmrc-tray file in /root. other changes are the further fleshing out of the other nine root menus, particularly with respect to the addition of the windows resize and move entries. also, to have all linux partitions automount by default, you'll need to move the the mnt-all-three script from the quar folder in Startup to Startup itself and click it/click it and move it to the Startup folder. to get the roxrefresh (bookmarks on the the menus) script to work, you'll first need to bookmark some folders in rox and then click the script.

User avatar
Puppus Dogfellow
Posts: 1667
Joined: Tue 08 Jan 2013, 01:39
Location: nyc

shortcut keys for the 24 desktops (go to and send to)

#26 Post by Puppus Dogfellow »

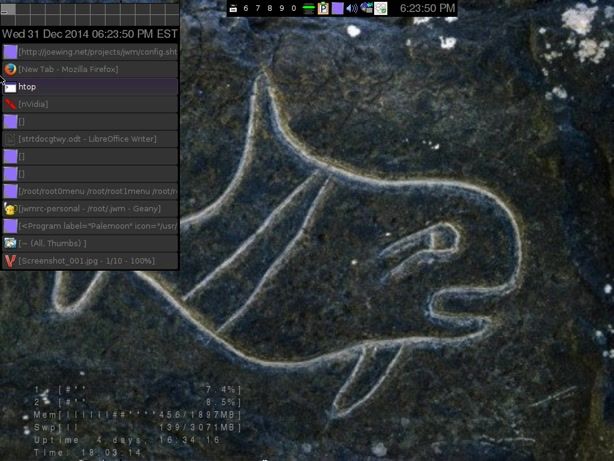
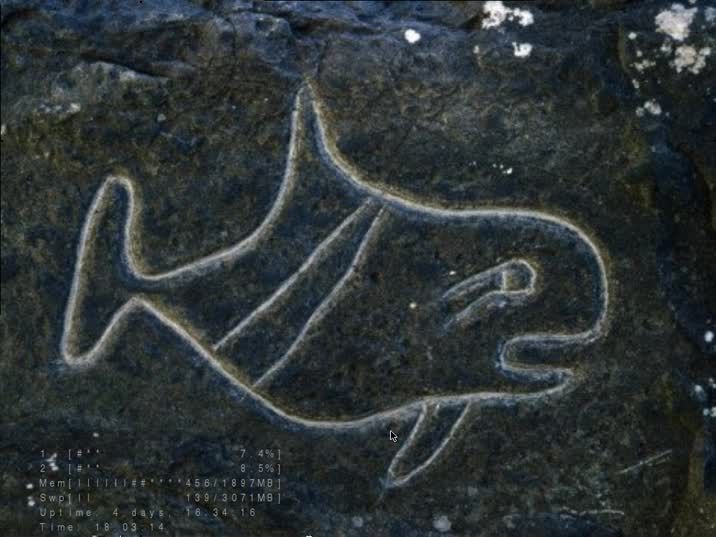
(background is a photo of a killer whale petroglyphby jeff foote)

Image

Image

here are the keycodes for /root/.jwm/jwmrc-personal:

go to desktop 1-12 is Alt + Control + [F1-F12];
go to desktop 13-24 is Alt + Shift + [F1-F12]:

Code: Select all

<Key mask="AC" key="F1">exec:d1</Key>
<Key mask="AC" key="F2">exec:d2</Key>
<Key mask="AC" key="F3">exec:d3</Key>	
<Key mask="AC" key="F4">exec:d4</Key>	
<Key mask="AC" key="F5">exec:d5</Key>	
<Key mask="AC" key="F6">exec:d6</Key>
<Key mask="AC" key="F7">exec:d7</Key>
<Key mask="AC" key="F8">exec:d8</Key>
<Key mask="AC" key="F9">exec:d9</Key>	
<Key mask="AC" key="F10">exec:d10</Key>
<Key mask="AC" key="F11">exec:d11</Key>
<Key mask="AC" key="F12">exec:d12</Key>	
<Key mask="SA" key="F1">exec:d13</Key>
<Key mask="SA" key="F2">exec:d14</Key>
<Key mask="SA" key="F3">exec:d15</Key>	
<Key mask="SA" key="F4">exec:d16</Key>	
<Key mask="SA" key="F5">exec:d17</Key>	
<Key mask="SA" key="F6">exec:d18</Key>
<Key mask="SA" key="F7">exec:d19</Key>
<Key mask="SA" key="F8">exec:d20</Key>
<Key mask="SA" key="F9">exec:d21</Key>	
<Key mask="SA" key="F10">exec:d22</Key>
<Key mask="SA" key="F11">exec:d23</Key>
<Key mask="SA" key="F12">exec:d24</Key>

send to 1-12 is Shift + Control + [F1-F12];
send to 13-24 is Shift + Alt + Control + [F1-F12]:

Code: Select all


<Key mask="SC" key="F1">exec:wmctrl -r :ACTIVE: -t0</Key>
<Key mask="SC" key="F2">exec:wmctrl -r :ACTIVE: -t1</Key>
<Key mask="SC" key="F3">exec:wmctrl -r :ACTIVE: -t2</Key>	
<Key mask="SC" key="F4">exec:wmctrl -r :ACTIVE: -t3</Key>	
<Key mask="SC" key="F5">exec:wmctrl -r :ACTIVE: -t4</Key>	
<Key mask="SC" key="F6">exec:wmctrl -r :ACTIVE: -t5</Key>
<Key mask="SC" key="F7">exec:wmctrl -r :ACTIVE: -t6</Key>
<Key mask="SC" key="F8">exec:wmctrl -r :ACTIVE: -t7</Key>
<Key mask="SC" key="F9">exec:wmctrl -r :ACTIVE: -t8</Key>	
<Key mask="SC" key="F10">exec:wmctrl -r :ACTIVE: -t9</Key>
<Key mask="SC" key="F11">exec:wmctrl -r :ACTIVE: -t10</Key>
<Key mask="SC" key="F12">exec:wmctrl -r :ACTIVE: -t11</Key>	
<Key mask="SAC" key="F1">exec:wmctrl -r :ACTIVE: -t12</Key>
<Key mask="SAC" key="F2">exec:wmctrl -r :ACTIVE: -t13</Key>
<Key mask="SAC" key="F3">exec:wmctrl -r :ACTIVE: -t14</Key>	
<Key mask="SAC" key="F4">exec:wmctrl -r :ACTIVE: -t15</Key>	
<Key mask="SAC" key="F5">exec:wmctrl -r :ACTIVE: -t16</Key>	
<Key mask="SAC" key="F6">exec:wmctrl -r :ACTIVE: -t17</Key>
<Key mask="SAC" key="F7">exec:wmctrl -r :ACTIVE: -t18</Key>
<Key mask="SAC" key="F8">exec:wmctrl -r :ACTIVE: -t19</Key>
<Key mask="SAC" key="F9">exec:wmctrl -r :ACTIVE: -t20</Key>	
<Key mask="SAC" key="F10">exec:wmctrl -r :ACTIVE: -t21</Key>
<Key mask="SAC" key="F11">exec:wmctrl -r :ACTIVE: -t22</Key>
<Key mask="SAC" key="F12">exec:wmctrl -r :ACTIVE: -t23</Key>

to get the seamless htop window (covering the drive icons in the pic), add

Code: Select all

<Group>
     <Name>urxvt</Name>
        <Option>noborder</Option> 
        <Option>notitle</Option>
		<Option>sticky</Option>
    </Group>
to jwmrc-personal (works when using the htOPuRXVT script in Startup or Startup/quar). to change the color of htop's fonts and set the transparency, use urxvtset.

User avatar
Puppus Dogfellow
Posts: 1667
Joined: Tue 08 Jan 2013, 01:39
Location: nyc

some screen shots, new shortcuts for the spacebar,

#27 Post by Puppus Dogfellow »

upped some screenshots of the (wmctrl-dependent) move and resize menus.

it shows active and select for dual and single screen setups. i will upload the the additional sendto :select: scripts for the terminal shortcuts when i up ~573 and ~574. despite what's written in the geany doc in the dual monitor shot, the stock geany setup for this series is actually document tabs across the top and not down the right side, possibly because a right click gives you the list vertically.

***

i've grown fond of the following shortcuts for the space bar, so ~573 and ~574 will likely have:

Code: Select all

<Key mask="A" key="space">exec:rox</Key>
<Key mask="C" key="space">exec:winswitcher</Key>
<Key mask="S" key="space">exec:rxvt</Key>
<Key mask="CA" key="space">window</Key>
<Key mask="CS" key="space">exec:gexec</Key>
<Key mask="AS" key="space">exec:closeallrox</Key>
<Key mask="CAS" key="space">showdesktop</Key>
in place of the originals.

***

thanks to OscarTalks, there are two skype packages available for precise puppy, both of which can be had as either an SFS or .pet. word is to use the apulse version unless you need to fiddle with your soundcards for some reason:

skype-4.3.0.37-pulseaudio-precise.pet

skype-4.3.0.37-apulse-precise.pet

skype-4.3.0.37-apulse-precise.sfs

skype-4.3.0.37-pulseaudio-precise.sfs


***
wine installation went smoothly with the w1734.sfs (pets by version 2013), so i decided to check out portable apps. turns out kompozer works fine, which makes me feel that removing the sea monkey suite wasn't such a big error. there's also a portable app version and shinobar has a portable linux version, though that may be without the html editor, etc. anyway, the next two (~573 and ~574) will have wine 1734 and a browser preinstalled, either palemoon 25.1 or firefox esr 31.4.


edit 5/12/15: updated skype and browser packages available
Last edited by Puppus Dogfellow on Tue 12 May 2015, 21:39, edited 1 time in total.

User avatar
Puppus Dogfellow
Posts: 1667
Joined: Tue 08 Jan 2013, 01:39
Location: nyc

i updated the nwp (nooby word processor)

#28 Post by Puppus Dogfellow »

nwpfor~572

from the readme:
update, 1/15:

to install: copy menu to a root menu and the scripts to /root/my-applications/bin. requires xdotool (preinstalled in these pups).
can be used without jwm by dragging the scripts to a rox panel
conversion can be done online or with full fledged word processors.
this ~572 version of the package includes the 24 send-tos by crosshair scripts and the 24 go to desktop scripts--sometimes the easiest way to send a
variety of things an array of places is to just have the folder with the send-tos open and click back and forth...sticky and layering scripts could come handy in those circumstances so they're included as well.


all the miriam derived (original) scripts are in the "highlight text then click to apply" submenu of the nwp jwm menu. it's been updated to include over twice the functions, many of which can either be inserted in a way that sandwiches selected text or in a way that pastes the tags necessary for a desired text or page formatting change. this is the default model (ie not in the submenu--if you decide you prefer the submenu's way of inserting the formatting codes, you can lift the whole menu out of the nwp menu and put it in a more prominent place in the/a menu structure) for the nooby word processor/nwp. the two most important text inserting scripts show up in the menu as poetry and other, and they paste the following into a text window, making them html documents which can be read with word processing programs or web browsers and easily converted to doc, docx, odt, etc. the advantage to using geany for word processing is speed, the tabbed browsing, and its incredible robustness--geany on puppy just never crashes, syncs well with dropbox, has (on the p and ~ series) a built in spelling dictionary that stays out of your way, and a built in file browser. you could also use the nwp with leafpad and take advantage of the windows manipulation shortcuts (geany can split the screen but not as many times as kate--with this and leafpad you could arrange a whole barrage of little text windows...and keep track of them all with Mochi's window switcher...)

#! /bin/sh
#set up txt docs as html--use geany and leafpad as word processors
#this is the one known as other--use this for most things.
xdotool type "<!DOCTYPE HTML>
<html>
<head>
<title></title>
</head>
<body>

(delete this and place your content here--apparently only that which is between the body tags is text on the "real" page...)


</body>
</html>"

---------------------------------------------------------------------------------------------

#! /bin/sh
#set up with preformatted setting in place
#this is the one the menu calls poetry. only what's between the two body tags is seen by word processors and browsers.
# the pre setting will preserve all your skipped lines and blank spaces--fonts and all that can be edited later in a real word processor.
#this is hard to beat for speed and document access though.
xdotool type "<!DOCTYPE HTML>
<html>
<head>
<title></title>
</head>
<body>
<pre>

(delete this and place your content here)

</pre>
</body>
</html>"


---------------------------------------------------------------------------------------------
contents of old nwp file:


<b>okay, a test ofthe nooby inspired</b>
word processor, really a script by miriam with
a few characters substituted here and there
you get bold
<sup>super</sup>
<sub>sub</sub>
<b>big</b>
<small><b>small</b></small>
<b><i>strikethrough</i></b>
<i>italics</i>


okay, it works really well. drag the icons to the desktop or a panel, highlight what you want formatted, click the appropriate icon/modification/script/....
menu is included, but below's what's there so far. all suggestions welcome (i was thinking of calling this post "how to accidentally pick up some html coding skills, which is one of the reasons i included the versions that merely paste the tags, requiring you to move them--you'll soon have a bunch of the code already in your clipboard and so it will eventually become faster just to type or select from that. i tested it out in libreoffice, seamonkey, firefox, chrome--main weirdness from the fact that it's not really a word processor is that you'll have to treat it as poetry with careful line breaks and such if you want no spaces skipped between your paragraphs or just get used to it since html seems to automatically insist on it). menu:

Code: Select all

<Menu label="NWPT" icon="" height="16">
 <Program label="poetry" icon="">htmltemplatepref</Program>
  <Program label="other" icon="">htmltxtwptemplate</Program>
     <Separator/>
 <Menu label="paste and place" icon="" height="16">    
  <Program label="Bold" icon="">swnwpb</Program>
<Program label="Italics" icon="">swnwpi</Program>
<Program label="Underline" icon="">swnwpu</Program>
<Program label="Subscript" icon="">swnwpsub</Program>
<Program label="Superscript" icon="">swnwpsup</Program>
<Program label="Strikethrough" icon="">swnwpstrk</Program>
<Program label="Big" icon="">swnwpbig</Program>
<Program label="Small" icon="">swnwpsm</Program>
<Program label="linebreak" icon="">linebreak</Program>  
<Program label="comment" icon="">nwpcomment</Program>
   <Separator/>
<Program label="preserved breaks and spaces" icon="">preotry</Program>
   <Separator/>
<Program label="paragraph" icon="">paragraph</Program>
<Program label="parleft" icon="">parleft</Program>
<Program label="parright" icon="">parright</Program>
<Program label="parcenter" icon="">parcenter</Program>
<Program label="parjustify" icon="">parjustify</Program>  
   <Separator/>
<Program label="nwpbkmrk" icon="">nwpbkmrk</Program>
<Program label="blockquote" icon="">nwpblockquote</Program>
<Program label="quote" icon="">quote</Program>
   <Separator/>
   <Program label="heading1" icon="">snwph1</Program>
<Program label="heading2" icon="">snwph2</Program>
<Program label="heading3" icon="">snwph3</Program>
<Program label="heading4" icon="">snwph4</Program>
<Program label="heading5" icon="">snwph5</Program>
<Program label="heading6" icon="">snwph6</Program>
   
   </Menu> 
<Separator/>
<Program label="NWP help" icon="">geany /root/my-applications/bin/nwp.readme</Program>
   <Separator/>
<Menu label="highlight text then click to apply" icon="" height="16">
<Program label="preserved breaks and spaces" icon="">preformatted</Program>
<Program label="heading1" icon="">nwph1</Program>
<Program label="heading2" icon="">nwph2</Program>
<Program label="heading3" icon="">nwph3</Program>
<Program label="heading4" icon="">nwph4</Program>
<Program label="heading5" icon="">nwph5</Program>
<Program label="heading6" icon="">nwph6</Program>
 <Separator/>
<Program label="Bold" icon="">nwpb</Program>
<Program label="Italics" icon="">nwpi</Program>
<Program label="Underline" icon="">nwpu</Program>
<Program label="Subscript" icon="">nwpsub</Program>
<Program label="Superscript" icon="">nwpsup</Program>
<Program label="Strikethrough" icon="">nwpstrk</Program>
<Program label="Big" icon="">nwpbig</Program>
<Program label="Small" icon="">nwpsm</Program>
<Program label="paragraph" icon="">paragraphhl</Program>
<Program label="nwpleft" icon="">nwpleft</Program>
<Program label="nwpright" icon="">nwpright</Program>
<Program label="nwpcenter" icon="">nwpcenter</Program>
<Program label="nwpjustify" icon="">nwpjust</Program>  
</Menu> 


</Menu> 


site i got most of the codes from: http://www.w3schools.com/html/default.asp

original nwp thread


edit: reupped the .gz to fix an error with the comment scripts and menu. you can make the fix manually by adding

Code: Select all

<Program label="comment" icon="">snwpcomment</Program>
to the paste and place menu (you can fix this one by just adding an s to the beginning of the program name) and

Code: Select all

 <Program label="comment" icon="">nwpcomment</Program> 
to the highlight and select submenu. the fixed nwpcomment script is:

Code: Select all

#! /bin/sh
#comment marks that surround highlighted text (comment inline 
#and not have it affect your document. send notes to yourself, 
#keep older versions of verses, paragraphs, etc.)

#xdotool type "<!-- -->"

#based on ht_b 2012-09-06 by miriam  

# adds <!-- -->  around a selection of text in any text editor/comments it out
xclip -o | sed 's/^/<!--/' | sed 's/$/-->/' | xclip -selection clipboard
xdotool type "`xclip -out -selection clipboard`"
copy to /root/my-applications/bin (overwrite what's there).

now the scripts that paste the codes and the scripts that surround selected text with the codes are in separate menus separated by a help file, which doubles as an easy way to launch geany. i foresee the central area of the menu growing with the edition of some preformatted tags (automatically format all <p>aragraph or <pre>formatted tags or present the css templates that will allow you to do it yourself).

User avatar
Puppus Dogfellow
Posts: 1667
Joined: Tue 08 Jan 2013, 01:39
Location: nyc

here's LibreOffice 4.4.0 sfs and pet

#29 Post by Puppus Dogfellow »

LibreOffice-4.4.0_en-US_xz.pet (214 mb), LibreOffice-4.4.0_en-US_xz.sfs(176mb)

i'm not sure if other distros are similarly affected, but the newest libre office doesn't appear to create desktop or menu entries in any of these precise spins or my regular precise 5.7.1 install. sfs and pet both exhibit the problem.

use

Code: Select all

#!/bin/sh

libreoffice4.4
as a script in the Startup folder and, when in libre, Menu>Tools>Options>Memory>Enable systray Quickstarter to be able to launch it from the desktop (or dock--close enough?). Alt+Spacebar (built-in rox /root shortcut) plus your rox speed dial shortcut to startup (control + number (0-9) of your choice when in a folder registers it as a speed dial) > / > [first letter of what you name the script] > enter. Or drag the script to the desktop and give it a shortcut (right click in rox > edit) that way. you can specify which part of the suite you want to launch:

Code: Select all

#!/bin/sh

libreoffice4.4 ---writer
or which file(s):

Code: Select all

#!/bin/sh

libreoffice4.4 ---writer /root/lo1.odt [separate full path of each additional file by a space]
you could also add the code(s) above to any of the ten menus:

Code: Select all

<Program label="Libre 4.4" icon="(pick something)">libreoffice4.4</Program>
or place a shortcut key in /root/.jwm/jwmrc-personal:

Code: Select all

<Key mask="4" key="space">exec:libreoffice4.4</Key>
____


here's 435, which doesn't require any workarounds.
LibreOffice-4.3.5_en-US_xz.pet (218MB) and LibreOffice-4.3.5_en-US_xz.sfs(179MB)


____

here's an updated wine.sfs based on version2013's most recent work:

w1735.sfs

___

here are two recommended packages:


mydbox-1.2_noarch.pet by Whitesnow

portable chrome by shinobar


****

edit: i may have overstated the menu problem. turns out an extra "fixmenus" entered into the terminal fixes it. there weren't any desktop entries created in usr/share/applications the first time around, even though they all exist and were created properly in /opt/libreoffice4.4/share/xdg/. if you are experiencing the lack of menu problem even after running the extra, manual fixmenus, it may be easiest to just highlight the icons in /opt/libreoffice4.4/share/xdg/ and drag them to usr/share/applications, choosing "create symlink" from the menu that pops up. you could drag icons for the start center or component programs from either of those two folders to the desktop if you'd like traditional icons and a way to launch from the pinboard. fixmenus, restart jwm.
Last edited by Puppus Dogfellow on Tue 10 Feb 2015, 20:27, edited 1 time in total.

User avatar
Puppus Dogfellow
Posts: 1667
Joined: Tue 08 Jan 2013, 01:39
Location: nyc

another browser option

#30 Post by Puppus Dogfellow »

i was able to get chromium 40 to work on precise 571/572 on two machines using only kost@s' chromium-40.0.2214.91.pet and lib6+libstdc6-4.9.2.pet. for two other installations, i had to also install the following dependencies:

libnss3_3.17.1-0ubuntu0.12.04.2_i386.deb

libnspr4-0d_4.9.2-1+deb7u2_i386.deb.

enjoy.

User avatar
Puppus Dogfellow
Posts: 1667
Joined: Tue 08 Jan 2013, 01:39
Location: nyc

like dropbox but more generous and versatile

#31 Post by Puppus Dogfellow »

megasync-precise.tar.gz

https://mega.nz/

files in compressed folder:

megasync-xUbuntu_12.04_i386.deb
libc-ares2_1.10.0-2_i386.deb
libicu48_4.8.1.1-3ubuntu0.1_i386.deb


so far only tested in Precise 5.5, Precise 5.7.1, and ~572. other distros may not need the two dependencies.

___


here's an sfs for mega

___


here's one for chromium 40
(pets and dependencies from previous page)

...

my main browser recommendation is palemoon 25.2.1, either the pet or the sfs. (thanks to OscarTalks for both.)
___

i also recommend zigbert and mavrothal's ppm update.

User avatar
Puppus Dogfellow
Posts: 1667
Joined: Tue 08 Jan 2013, 01:39
Location: nyc

thought i had already added this...

#32 Post by Puppus Dogfellow »

since the (24) desktop shortcuts have now been relocated, the alt+# shortcuts can now be used for the root menus. i swapped out root three below for window, but the following is my suggestion for dual screen monitors. replace corresponding shortcuts in /root/.jwm/jwmrc-personal:

Code: Select all

<Key mask="A" key="1">root:1</Key>
<Key mask="A" key="2">root:2</Key>
<Key mask="A" key="3">root:3</Key>
<Key mask="A" key="4">root:4</Key>
<Key mask="A" key="5">root:5</Key>
<Key mask="A" key="6">root:6</Key>
<Key mask="A" key="7">root:7</Key>
<Key mask="A" key="8">root:8</Key>
<Key mask="A" key="9">root:9</Key>
<Key mask="A" key="0">root:10</Key>


<Key mask="AC" key="1">exec:a1</Key>
<Key mask="AC" key="2">exec:a2</Key>
<Key mask="AC" key="3">exec:a3</Key>
<Key mask="AC" key="4">exec:a4</Key>
<Key mask="AC" key="5">exec:a5</Key>
<Key mask="AC" key="6">exec:a6</Key>
<Key mask="AC" key="7">exec:a7</Key>
<Key mask="AC" key="8">exec:a8</Key>
<Key mask="AC" key="9">exec:a9</Key>
<Key mask="AC" key="0">exec:a10</Key>


<Key mask="AS" key="1">exec:b1</Key>
<Key mask="AS" key="2">exec:b2</Key>
<Key mask="AS" key="3">exec:b3</Key>
<Key mask="AS" key="4">exec:b4</Key>
<Key mask="AS" key="5">exec:b5</Key>
<Key mask="AS" key="6">exec:b6</Key>
<Key mask="AS" key="7">exec:b7</Key>
<Key mask="AS" key="8">exec:b8</Key>
<Key mask="AS" key="9">exec:b9</Key>
<Key mask="AS" key="0">exec:b10</Key>
a and b series resize/reposition the active window:

a1 -- upper left quadrant of left screen
a2 -- upper right quadrant of left screen
a3 -- lower left quadrant of left screen
a4 -- lower right quadrant of left screen
a5 -- quadrant-sized window placed at center of left screen
a6 -- upper left quadrant of right screen
a7 -- upper right quadrant of right screen
a8 -- lower left quadrant of right screen
a9 -- lower right quadrant of right screen
a10 -- quadrant-sized window placed at center of right screen


b1 -- left half of left screen
b2 -- right half of left screen
b3 -- top half of left screen
b4 -- bottom half of left screen
b5 -- full screen left
b6 -- left half of right screen
b7 -- right half of right screen
b8 -- top half of right screen
b9 -- bottom half of right screen
b10 -- full screen right

User avatar
Puppus Dogfellow
Posts: 1667
Joined: Tue 08 Jan 2013, 01:39
Location: nyc

tips 'n' scripts for xpad

#33 Post by Puppus Dogfellow »

the xpad notes can pile up, and accidentally left clicking the dock icon instead of right clicking it can dump 70 windows on your desktop when all you wanted was the list of seventy to pick from.

http://unix.stackexchange.com/questions ... date-where

offers a solution. the following code will take all the content files (as opposed to the configuration files, which are labelled "info-...") and combine them into a single file ordered by date modified, most recent at the top.
cat $(ls -t con*) > /root/my-documents/Text/xpadstrats
enter that in a terminal when in the /root/.config/xpad folder (you can change the location and name of the output file (the blue bit)--this one places it in /root/my-documents/Text and calls it xpadstrats. it gets created on the fly so any name will do. without a path, it will be placed in the same folder in which it's run). move the combined file to a location of your choice and delete all the files in /root/.config/xpad except server and default-style--fresh start with no data loss.

for xpad at startup, drag usr/bin/xpad to /root/Startup and choose symlink from the pop up.

__________________________

here are two scripts to automate the process, xpad-backup for the backup/combine task and xpad-clear for the deleting of the old notes and their configuration files:


backup and archive:

Code: Select all


#!/bin/sh
#xpad-backup
# will place a combined text (xpadbackup1) of all the xpads, ordered most recent first, in /root. you can change both the location and title of the combined document by altering the text and/or path below after the space after the >. rewrite or move to a convenient location as subsequent backups will overwrite the file if you don't--a possibly undesirable thing if you've used xpad-clear to delete the ones now in that root file.
# name this script xpad-backup and place in root/my-applications/bin 
# for a menu entry in jwm, use 
#<Program label="xpad-backup">xpad-backup</Program> 
# place in any root menu, enter jwm -restart into a terminal. (if you choose the root 3 menu, i.e. the one in /etc rather than the ones in /root, you'll need to instead enter fixmenus, which is never as fast).


cd /root/.config/xpad
cat $(ls -t con*) > /root/xpadbackup1

#version 2. the following two lines add a measure of safety by backing up  each copy of the condensed file in (whatever folder you choose--here it's set to:) /root/my-documents/Text. the numbered backups don't overwrite one another, so while you'll lose the previous file deposited in root, there'll still be a copy of it elsewhere. if you're really paranoid about losing your notes, you can symlink the /root/.config/xpad folder to a dropbox folder or similar.


cd /root
cp --backup=t xpadbackup1 /root/my-documents/Text  


wipe out:

Code: Select all

#!/bin/sh
# xpad-clear
# erases old xpads--use after xpad-backup
# pretty sure you can ditch the -t --think of it as a mini sleep in case you press one too closely after another and risk erasing what you're trying to copy...
# these comments are arguably unnecessary bloat as well
# name this script xpad-clear and place in root/my-applications/bin 
# for a menu entry in jwm, use 
#<Program label="xpad-clear">xpad-clear</Program> 
# place in any root menu, enter jwm -restart into a terminal. (if you choose the root 3 menu, i.e. the one in /etc rather than the ones in /root, you'll instead need to enter fixmenus into a terminal for the entries to show)


cd /root/.config/xpad
rm $(ls -t info*)
rm $(ls -t con*)


musher0
Posts: 14629
Joined: Mon 05 Jan 2009, 00:54
Location: Gatineau (Qc), Canada

#35 Post by musher0 »

Hi, Puppus.

Thanks for the inclusion of my wrapper in your collection/pups.

Thanks also for digging out aragon's tree ! Good find! I didn't even know
he had created a variant of tree.

BFN.

musher0
musher0
~~~~~~~~~~
"You want it darker? We kill the flame." (L. Cohen)

Post Reply